Tips How To Edit Picture In PowerPoint PPT Template
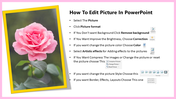
How to Edit Picture in PowerPoint PPT Template
Pictures play an important role in making presentations visually appealing and easy to understand. Editing images in PowerPoint helps you improve their appearance, adjust colors, remove unwanted backgrounds, and apply creative effects to match your presentation theme. Instead of starting from scratch, you can download ready-made slides from SlideEgg and customize them to suit your needs. With PowerPoint's built-in picture editing tools, you can enhance your visuals and create a more professional presentation in just a few steps.
What this deck helps bring into focus
This presentation explains the essential steps for editing pictures in PowerPoint. It covers selecting an image, accessing the Picture Format tab, removing backgrounds, adjusting brightness and contrast, changing picture colors, applying artistic effects, and customizing picture styles. These steps help users understand how to improve images and make them fit their presentation design.
Why the visual style fits the category
A clear, step-by-step layout makes picture editing instructions easier to follow. The organized content helps users understand each editing option without confusion, while the visual presentation supports a more practical learning experience. You can customize the slides with screenshots, examples, and illustrations to demonstrate each PowerPoint feature effectively.
Where it makes practical sense
This template is useful for students, teachers, office professionals, presentation designers, and beginners learning PowerPoint. Use it for classroom demonstrations, software tutorials, employee training, or workshops on presentation design. It provides a convenient way to explain picture editing techniques and help audiences improve their presentation visuals with confidence.
Step-by-step method to edit a picture in PowerPoint
Step 1: Select the picture. Click the image you want to edit.
Step 2: Open Picture Format. Select the Picture Format tab on the PowerPoint ribbon.
Step 3: Remove the background. Choose Remove Background to mark and remove unwanted background areas.
Step 4: Adjust brightness and contrast. Select Corrections to improve the picture's brightness, sharpness, and contrast.
Step 5: Change picture colors. Use Color to adjust saturation, tone, or recolor the image.
Step 6: Apply artistic effects. Select Artistic Effects to give your picture a different visual appearance.
Step 7: Change the picture style. Choose a Picture Style to apply predefined borders, shapes, and visual treatments.
Step 8: Add borders, effects, or layouts. Use the available Picture Format options to enhance the image and align it with your slide design.
Editing pictures in PowerPoint is simple when you know which tools to use. By following these steps, you can improve your images, maintain a consistent visual style, and create more engaging presentations.
Features of this template:
100% customizable slides for easy editing and downloading.
Available in 16:9 and 4:3 formats.
Easy-to-edit text, colors, and slide elements.
Compatible with PowerPoint and Google Slides.
Covers essential PowerPoint picture editing tools.
Explains background removal, color correction, and artistic effects.
Helps beginners learn picture customization step by step.
Suitable for tutorials, classroom lessons, and professional training.
Well-crafted design with an instant download option.
More Collections for Tips How To Edit Picture
Recommended based on this template.

Similar Templates to Tips How To Edit Picture


















Showing36 of69,218 templates