30 million PowerPoint presentations are created every day. Most of them start the same way — a blank slide, a font argument, and an hour lost searching for a template that doesn’t look like it was designed in 2009.
The SlideEgg PowerPoint Add-in solves this entirely. Instead of leaving PowerPoint to search, download, and import templates, you browse and insert them directly inside PowerPoint — without ever opening a browser. In 2026, it’s the fastest way to go from blank slide to professional-looking deck.
This guide covers everything: how to install the SlideEgg Add-in on Windows and Mac, how to use it to insert templates, how to customise what you insert, and how to fix the most common issues. All steps apply to PowerPoint 2016 and later, including Microsoft 365.
Quick start — 60-second version
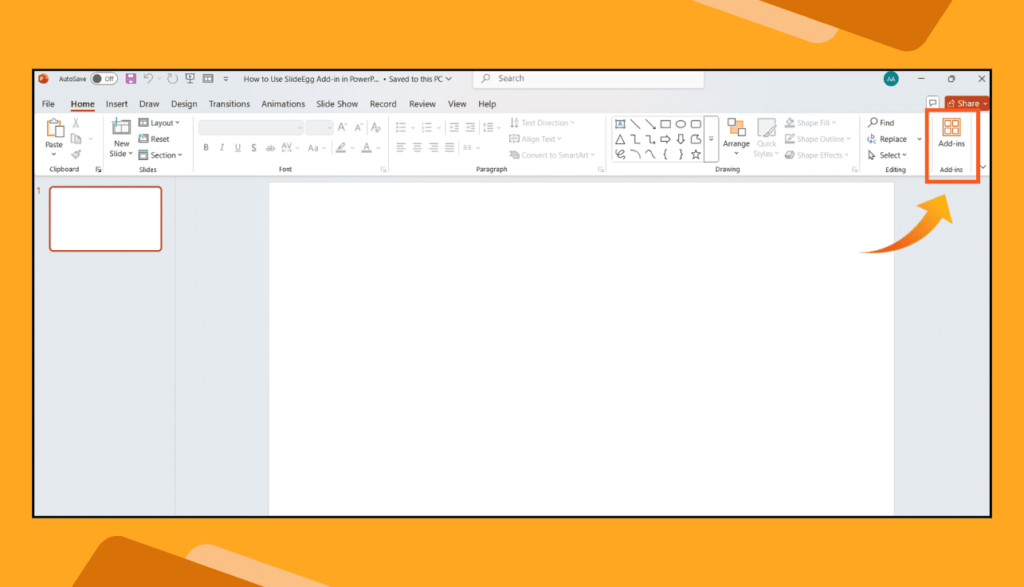
- Open PowerPoint → click Home tab → click Add-ins
- Search for SlideEgg → click Add → click Continue
- Click the SlideEgg icon in the ribbon → sign up or log in
- Browse templates → click any thumbnail → click Insert
- Edit with your content and present
What is a PowerPoint Add-in — and why does it matter?
A PowerPoint Add-in is a third-party extension that installs directly inside PowerPoint and adds features not built into the software by default. Think of it as an app that lives inside PowerPoint — accessible from the ribbon, running in a panel alongside your slides, without requiring you to switch to a browser or desktop app.
Add-ins are installed once and available every time you open PowerPoint. They load from Microsoft’s secure Office Add-ins infrastructure, which means they go through Microsoft’s review and approval process before they can appear in the store. You can see the full list of available add-ins in the Microsoft AppSource marketplace.
The SlideEgg Add-in brings SlideEgg’s full library of 100,000+ professionally designed templates — business, education, marketing, medical, technology, and more — directly into your PowerPoint panel. You browse, preview, and insert without leaving the application.
Why use the SlideEgg Add-in instead of downloading templates from the website?
Both options give you access to the same templates. The difference is workflow speed and convenience.
| Feature | Website download | SlideEgg Add-in |
|---|---|---|
| Browse templates | In browser — separate window | Inside PowerPoint panel |
| Import template | Download → open file → copy slides | One click — inserts instantly |
| Time to insert | 2–5 minutes | Under 10 seconds |
| Internet required | Yes (browsing) | Yes (browsing and inserting) |
| Works offline after insert | Yes | Yes |
| Access to full library | Yes | Yes |
| Premium templates | Yes (subscription) | Yes (subscription) |
For regular PowerPoint users who insert templates frequently, the Add-in saves a meaningful amount of time. Downloading and importing even one template takes 2–5 minutes; the Add-in reduces this to under 10 seconds.
Step 1 Open PowerPoint and access the Add-ins Store
🖥 Windows
- Open Microsoft PowerPoint
- Click the Home tab in the ribbon
- Click Add-ins on the right side of the ribbon
- The Office Add-ins Store panel opens on the right
🍎 Mac
- Open Microsoft PowerPoint for Mac
- Click the Insert tab in the ribbon
- Click Get Add-ins
- The Office Add-ins Store panel opens on the right
Don’t see the Add-ins button? Make sure PowerPoint is updated to the latest version. Go to File → Account → Update Options → Update Now (Windows) or Help → Check for Updates (Mac). The Add-ins feature requires PowerPoint 2016 or later, or any Microsoft 365 version.
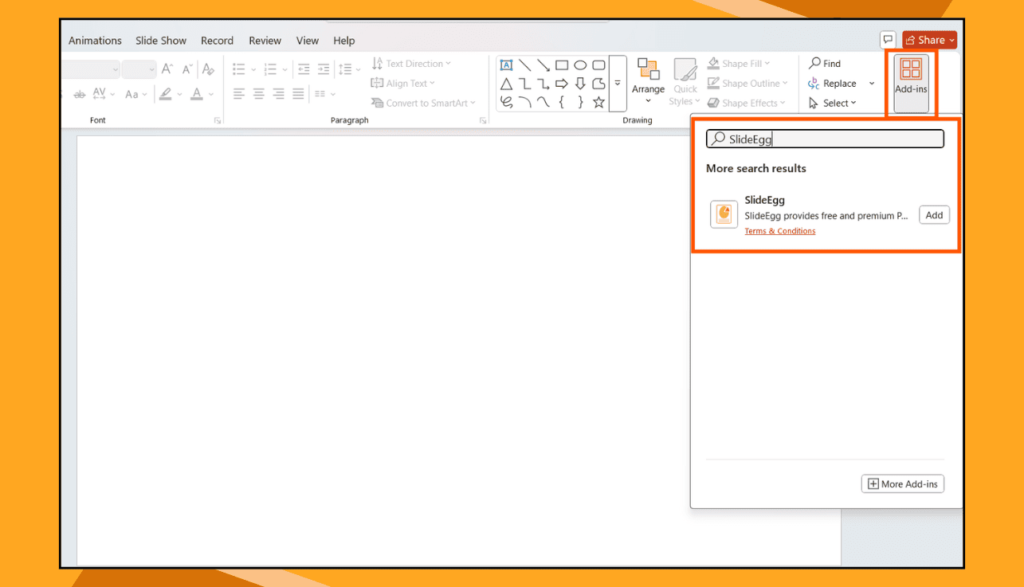
Step 2: Search for and install the SlideEgg Add-in
- In the Office Add-ins Store panel, locate the search bar at the top.
- Type SlideEgg and press Enter.
- The SlideEgg Add-in will appear in the search results — look for the orange SlideEgg logo.
- Click Add next to the SlideEgg result.
- A permissions dialog will appear asking you to confirm the installation. Click Continue.
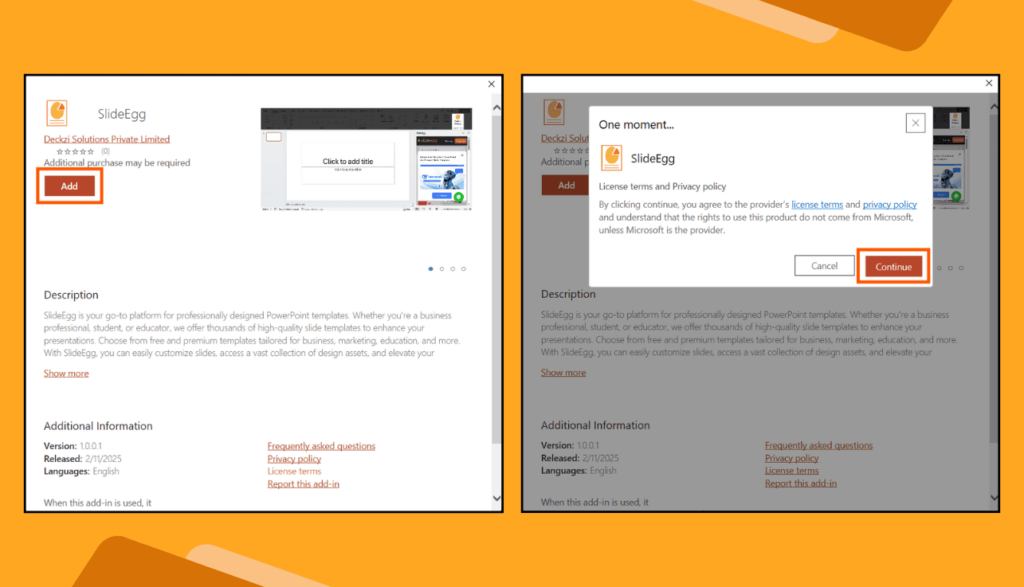
- The add-in installs in seconds. The SlideEgg icon will now appear in your PowerPoint ribbon — usually next to the Add-ins button.
Installation is permanent until removed. Once installed, SlideEgg will be available every time you open PowerPoint on this device — you don’t need to reinstall it. If you work across multiple computers, you’ll need to install it separately on each one, though your SlideEgg account (and saved templates) will sync once you log in.
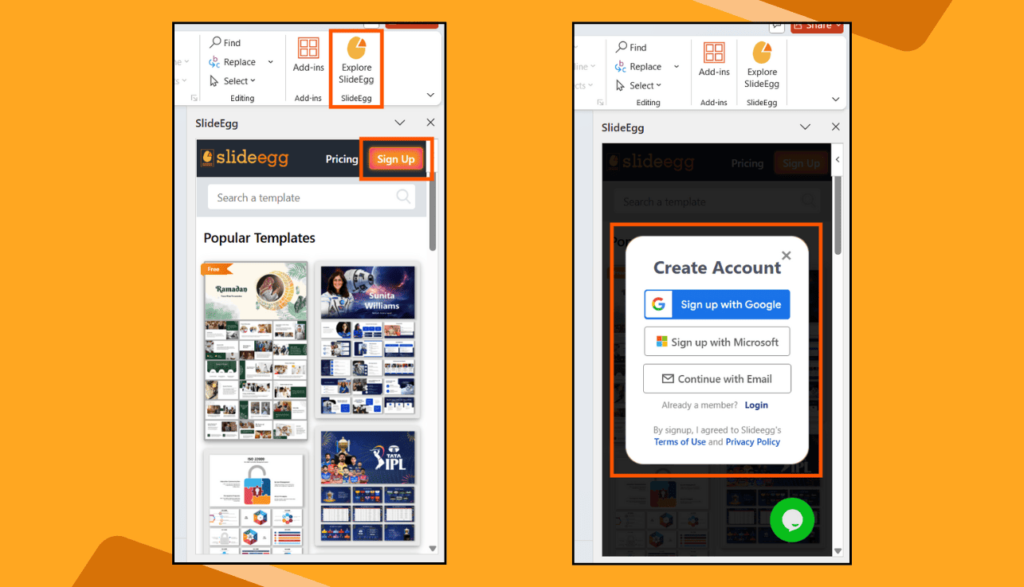
Step 3: Sign up or log in to your SlideEgg account
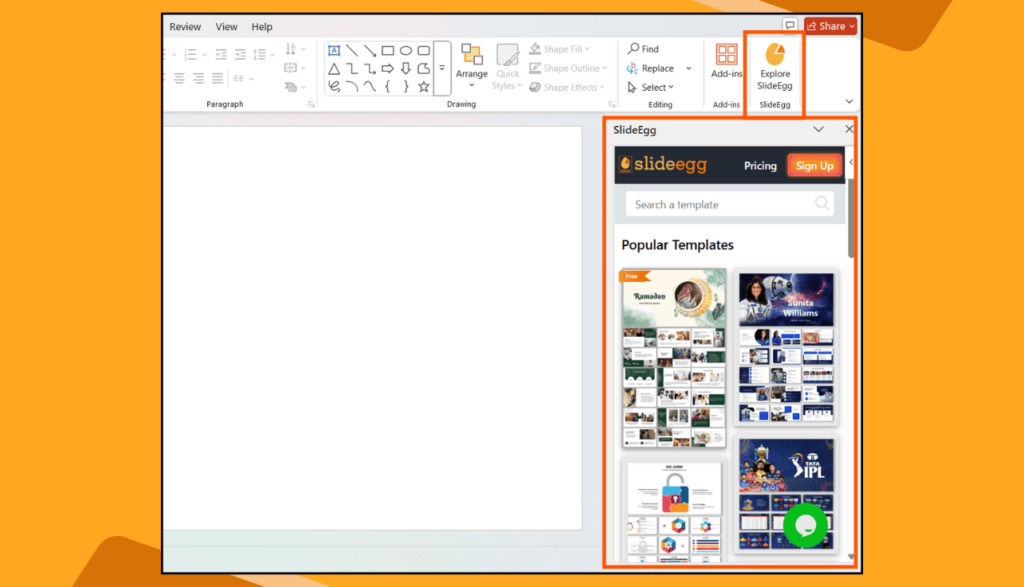
- Click the SlideEgg icon in the ribbon. The SlideEgg panel opens on the right side of your PowerPoint window.
- If you are new to SlideEgg, choose how to create your free account:
- Sign up with Google — fastest option, uses your existing Google account
- Sign up with Microsoft — recommended if you use Microsoft 365
- Continue with Email — create an account with any email address
- If you already have a SlideEgg account, click Login and enter your credentials.
Your account gives you access to your saved templates, download history, wishlist, and premium subscription if you have one. Logging in with the same account you use on the SlideEgg website means your preferences and saved items carry over seamlessly.
Step 4: Browse templates and insert into your slide
- After logging in, the SlideEgg template library loads inside the panel. You will see a grid of template thumbnails.
- Browse by category using the category tabs at the top — Business, Education, Marketing, Medical, Technology, and more.
- Search by keyword using the search bar inside the panel. Try terms like “timeline”, “org chart”, “pitch deck”, “infographic”, or “SWOT analysis”.
- Click any template thumbnail to preview it at a larger size. The preview shows all slides in the deck so you can check the full layout before inserting.
- Click Insert to add the template to your current PowerPoint slide. The slide appears instantly — no downloading, no file management, no importing.
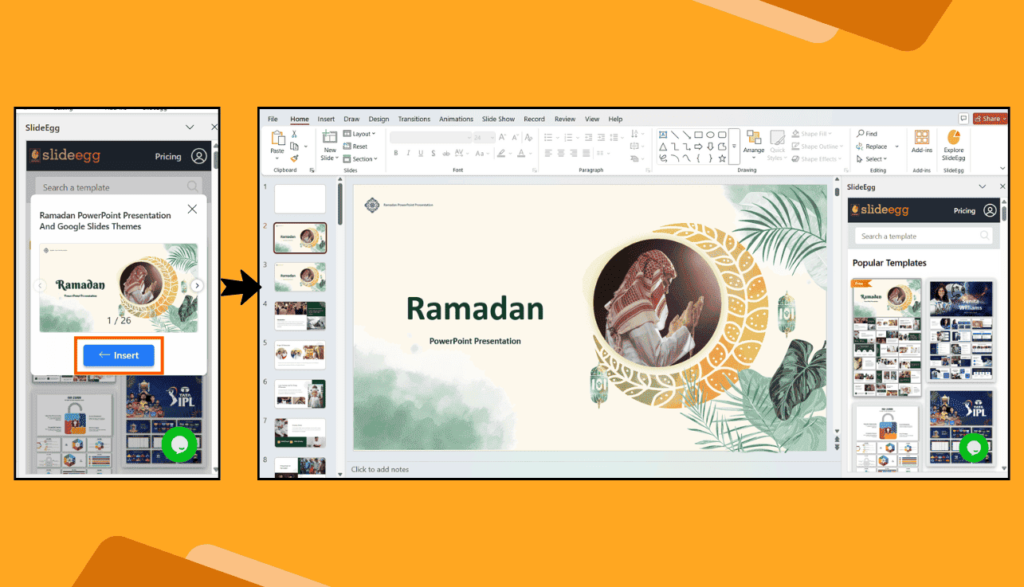
Inserting a full deck vs. a single slide: Some SlideEgg templates are single slides; others are multi-slide decks. When you insert a multi-slide deck, all slides are added to your presentation starting from the current slide position. If you only want one slide from a deck, delete the others after inserting — it’s faster than manually copying individual slides from a downloaded file.
Step 5:Customise the inserted template
Every template inserted via the SlideEgg Add-in is built with native PowerPoint vector elements — fully editable, infinitely resizable, and never locked. Here’s how to customise efficiently:
- Edit text: Double-click any text box and type your content. All fonts are embedded so they display correctly on any machine.
- Change colours: Click a shape, go to Format Shape → Fill and choose your brand colour. To change all shapes of one colour at once, right-click a shape → Select All Similar Objects in Format Shapes, then recolour the group.
- Replace placeholder images: Right-click an image placeholder → Change Picture → From a File to insert your own photo or graphic.
- Resize without quality loss: Drag any corner handle to resize. Because all elements are native PowerPoint vectors, nothing pixelates regardless of how large you scale them.
- Swap icons: SlideEgg icons are vector shapes — click one, delete it, and insert a replacement from Insert → Icons or paste in your own SVG.
Brand consistency tip: Set your brand colours and fonts in the Slide Master (View → Slide Master) before customising individual slides. Changes to the Slide Master propagate across all slides automatically, saving you from recolouring elements one by one.
Accessing premium templates
The SlideEgg Add-in gives free account holders access to thousands of professionally designed templates at no cost. Premium templates — identifiable by the crown icon in the panel — require a SlideEgg Premium subscription.
Premium benefits inside the Add-in include:
- Access to the full 100,000+ template library with no restrictions
- Exclusive designs not available on the free tier
- High-resolution exports and commercial usage rights
- Priority access to new template releases
You can also browse and download the complete free template collection directly at slideegg.com/free-powerpoint-templates — no add-in required.
Troubleshooting common SlideEgg Add-in problems
The SlideEgg icon doesn’t appear after installation
Close and reopen PowerPoint. Add-ins sometimes require a restart to appear in the ribbon. If the icon still doesn’t appear, go to Home → Add-ins → Manage My Add-ins and check that SlideEgg is listed and toggled on.
The Add-ins button is greyed out or missing
This usually means your PowerPoint is managed by an organisation’s IT policy that restricts add-in installations. Contact your IT administrator and ask them to enable third-party add-ins for your account, or allow the SlideEgg add-in specifically via the Microsoft 365 admin centre.
Templates won’t load or the panel shows an error
Check your internet connection — the Add-in requires an active connection to load templates. If you’re connected but still seeing errors, sign out of the Add-in panel, close PowerPoint, reopen it, and sign back in. This resolves most session-related loading issues.
The Add-in asks me to log in every time I open PowerPoint
This is usually a browser cookie or credential caching issue. Try signing in using the Sign in with Microsoft option, which uses your Microsoft 365 session and typically stays logged in longer than email-based login.
PowerPoint is too old to support the Add-in
The Office Add-ins infrastructure requires PowerPoint 2016 or later. If you are running PowerPoint 2013 or older, you cannot install the SlideEgg Add-in. Download templates directly from slideegg.com as .pptx files instead.
Tips for getting the most out of the SlideEgg Add-in in 2026
- Use search terms, not categories. The Add-in’s search bar is faster than browsing categories when you know what you need. “Sales funnel”, “quarterly review”, “project roadmap”, and “team introduction” all return targeted results in seconds.
- Insert into a blank deck, not an existing one. If you’re building a new presentation, start with a blank file and insert templates into it — this avoids layout conflicts with your existing slide master. If adding to an existing deck, paste the inserted slide and then match its fonts and colours to your template manually.
- Preview before inserting. Multi-slide template decks can add 10–20 slides at once. Always preview to check the full layout before inserting, and delete slides you don’t need immediately after.
- Combine multiple templates. There’s no rule saying you must use one template per presentation. Insert an agenda slide from one template, a timeline from another, and a data chart from a third. Mix and match by normalising colours and fonts in the Slide Master to keep the deck coherent.
- Keep the Add-in panel closed when presenting. The SlideEgg panel stays open until you close it. Before going into Slide Show mode, close the panel by clicking the X in its corner — it won’t affect your slides but it prevents any visual distraction.
Frequently asked questions
Is the SlideEgg PowerPoint Add-in free to install?
Yes, the SlideEgg Add-in is completely free to install and comes with access to thousands of free templates immediately after signing up. Premium templates — which include exclusive, high-end designs not available on the free tier — require a SlideEgg Premium subscription. The free tier is genuinely useful with no credit card required.
Does the SlideEgg Add-in work on Mac?
Yes. The Add-in works on both Windows and Mac versions of Microsoft PowerPoint, including Microsoft 365. On Mac, access it via Insert → Get Add-ins instead of the Add-ins button on the Home tab. Once installed, the template browsing and insertion experience is identical on both platforms.
Do I need an internet connection to use the SlideEgg Add-in?
Yes — an active internet connection is required to browse and insert templates, as the library is cloud-hosted. Once a template has been inserted into your slide, it is fully embedded in your .pptx file and you can edit and present it offline without any issues. The add-in does not cache templates locally.
Why can’t I find the SlideEgg Add-in in PowerPoint?
Try these fixes in order: (1) Update PowerPoint to the latest version via File → Account → Update Options → Update Now. (2) Confirm you are signed into a Microsoft account — the Add-ins Store requires one. (3) If your organisation manages your Microsoft 365 account, IT policy may be blocking third-party add-ins. Ask your IT administrator to enable add-ins or allowlist SlideEgg specifically. (4) Restart PowerPoint and try searching again.
How many templates does the SlideEgg Add-in give access to?
The SlideEgg Add-in connects to SlideEgg’s complete library of 100,000+ professionally designed slides across business, education, marketing, medical, technology, and dozens of other categories. Free account holders can browse and insert thousands of templates at no cost. Premium subscribers unlock the full library with no restrictions.
Can I use the SlideEgg Add-in in Google Slides or Canva?
The SlideEgg Add-in is built for Microsoft PowerPoint and is only available through the Microsoft Office Add-ins Store. It is not currently available for Google Slides or Canva. However, SlideEgg templates can be opened directly in Google Slides from the SlideEgg website — many template pages have a one-click Google Slides button that opens the template in your Google account without downloading anything.
Are SlideEgg Add-in templates fully editable in PowerPoint?
Yes — completely. Every template inserted via the Add-in uses native PowerPoint vector shapes, editable text boxes, and recolourable icons. Nothing is locked, flattened, or rasterized. You can edit text by double-clicking, recolour shapes via Format Shape, replace images by right-clicking, and resize everything without quality loss. The templates behave exactly like slides you built yourself from scratch.