Google Slides is free, browser-based, and collaborative — but it doesn’t come with built-in roadmap templates. Here’s the fastest way to create a professional roadmap slide without starting from scratch.
If your team runs on Google Workspace, you’ve probably been asked to “put together a roadmap” in Google Slides at least once. The challenge: Google Slides doesn’t have a built-in roadmap tool, and building one manually from shapes takes time. This guide walks you through both methods — the manual way and the smart way — using free roadmap presentation templates that are fully compatible with Google Slides.
Method 1: Create a Roadmap in Google Slides from Scratch
This method works well if you want a simple, single-row timeline roadmap and don’t mind spending 30–45 minutes on formatting.
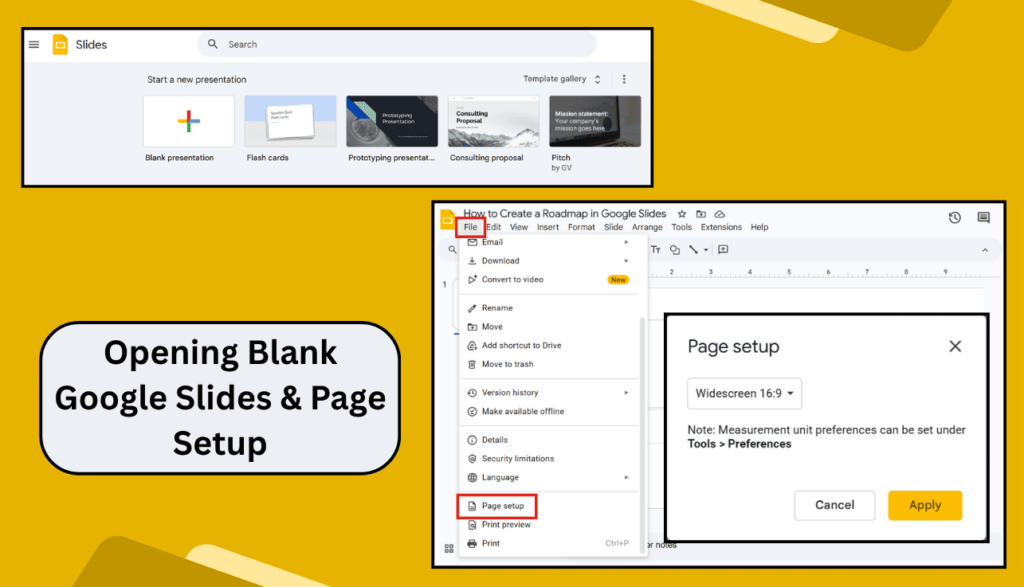
1. Open Google Slides and Set Up Your Slide
Go to slides.google.com and open a new presentation. Set the layout to “Blank” (right-click the slide panel → Apply layout → Blank). For a wide roadmap, use a 16:9 slide size (File → Page setup → Widescreen 16:9).
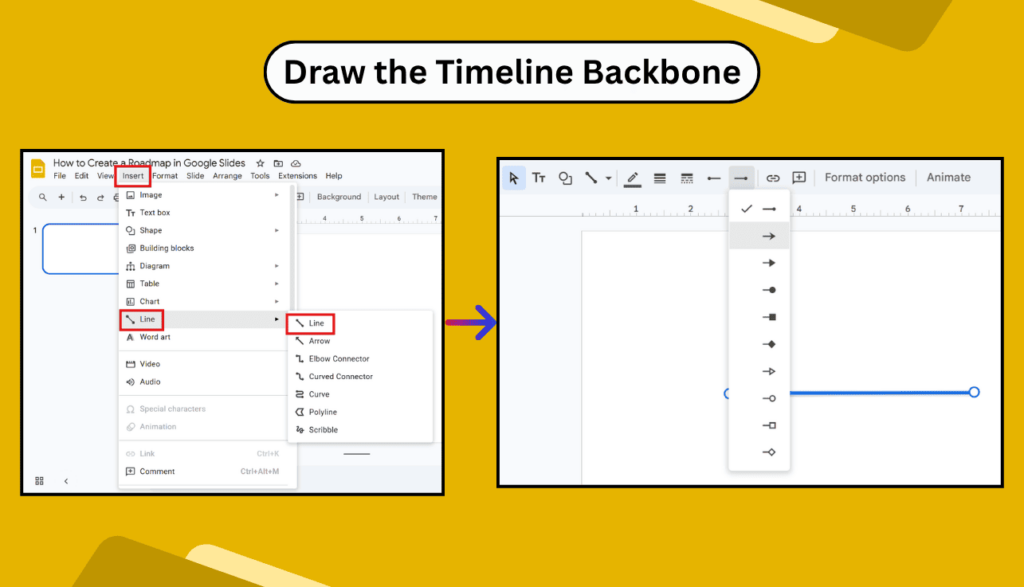
2. Draw the Timeline Backbone
Go to Insert → Line and draw a horizontal line across the center of the slide. Hold Shift to keep it straight. Then add an arrow: click on the line → Format options → Line end → Forward arrow.
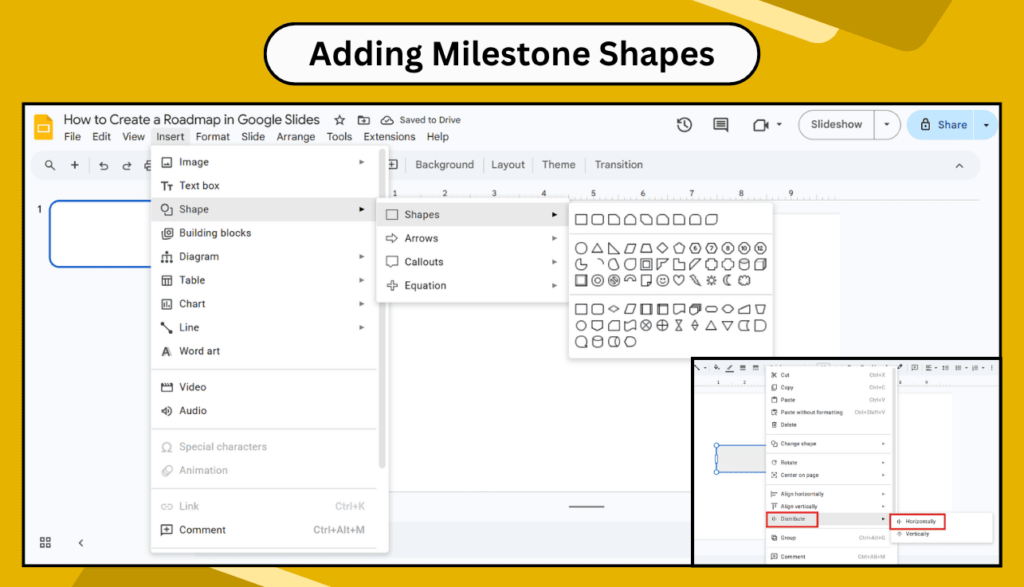
3. Add Milestone Shapes
Go to Insert → Shape → Shapes and select a circle or diamond. Place it on the timeline line. To duplicate: select the shape, press Ctrl+D (Cmd+D on Mac), then drag to the next milestone position. Use Format → Arrange → Distribute horizontally to space them evenly.
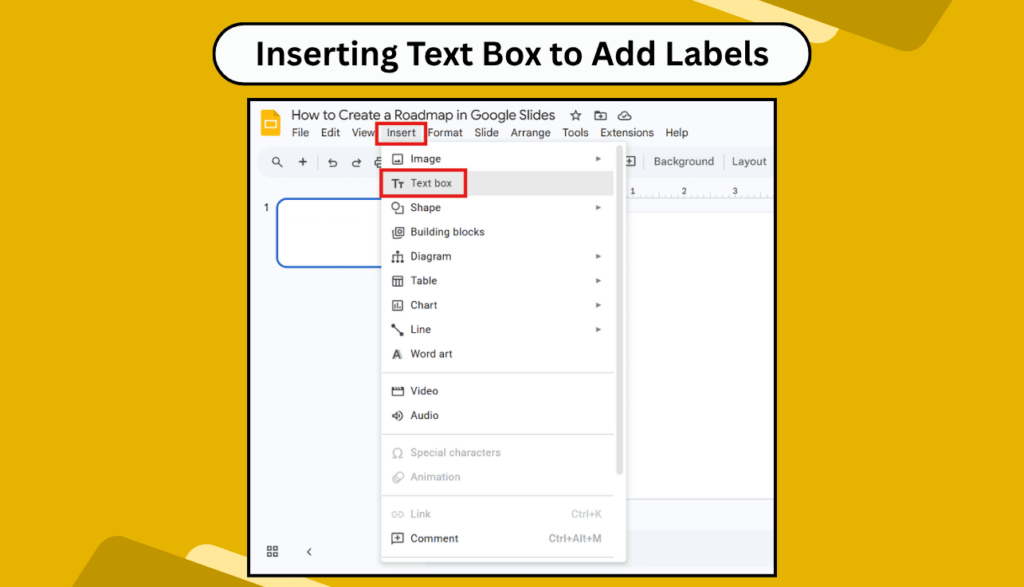
4. Add Text Labels and Dates
Double-click each shape to add text, or use Insert → Text box to add labels above and below the timeline. Alternate positions (above/below) to avoid visual clutter. Use 11–12pt font for milestone labels.
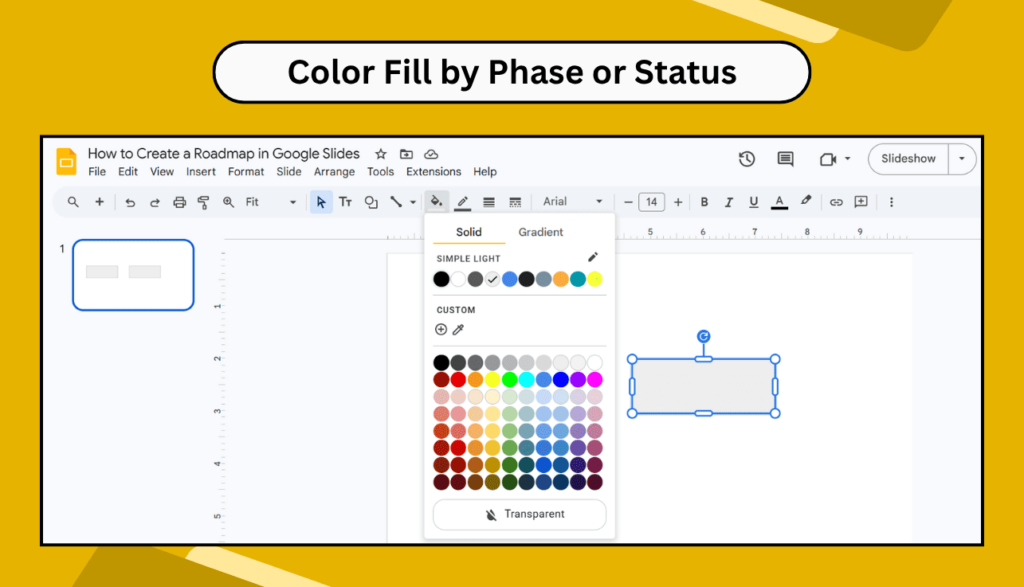
5. Color Code by Phase or Status
Select milestone shapes by phase → click the fill color icon → choose your color. In Google Slides, you can use custom hex codes under “Custom” in the color picker to match your brand colors exactly.
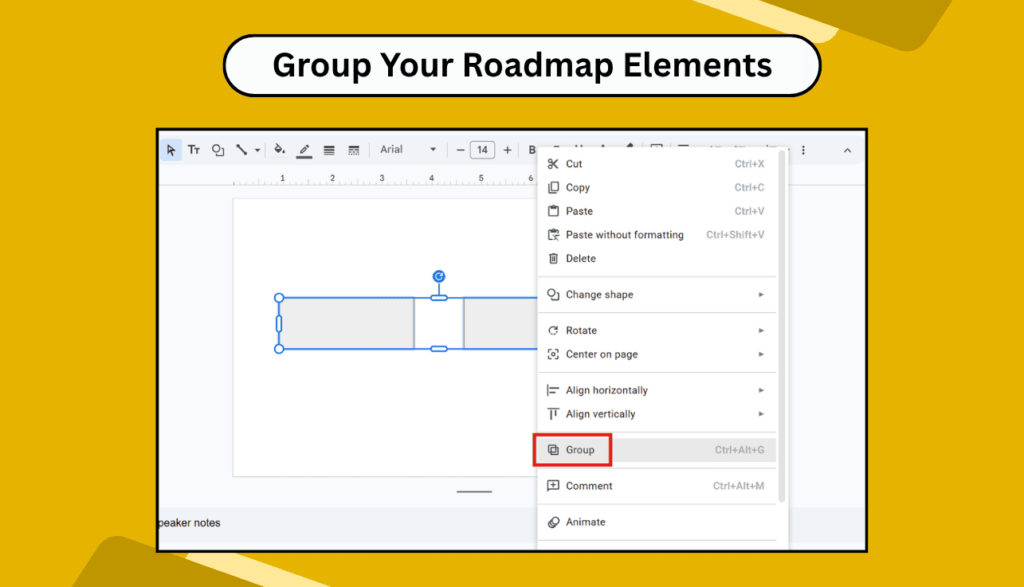
6. Group Your Roadmap Elements
Select all shapes and lines → right-click → Group. This locks your layout so nothing shifts when you add text or share the file. Save as .pptx if you need PowerPoint compatibility.
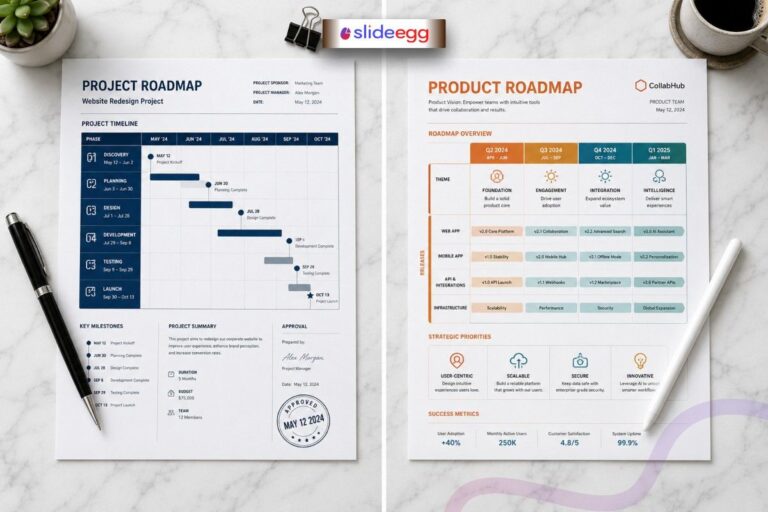
Method 2: Use a Free Roadmap Template in Google Slides (Recommended)
The fastest way to create a roadmap in Google Slides is to download a pre-designed template and import it. SlideEgg’s free roadmap templates are all compatible with Google Slides — here’s how to use them:
- Go to SlideEgg’s roadmap category and choose a template that fits your use case (project, product, IT, strategic, etc.).
- Click Download — the file saves as a .pptx file. No login required for most free templates.
- Open Google Drive (drive.google.com) → click New → File Upload → select your downloaded .pptx file.
- Once uploaded, right-click the file in Google Drive → Open with → Google Slides.
- Edit directly in Google Slides — click any text box to update milestones, dates, and labels. All shapes, colors, and layouts are fully editable.
If your template has custom fonts that aren’t available in Google Slides, the app will substitute a default font. To preserve fonts, download and install Google Fonts that match — or adjust the font choice in the template before sharing.
What to Include in a Google Slides Roadmap
Regardless of your template style, every effective roadmap slide needs these elements:
- A clear title — State what the roadmap covers (e.g., “Q3 2026 Product Roadmap” or “IT Transformation Roadmap”)
- Time axis — Weeks, months, quarters, or years depending on your project scope
- Phases or swimlanes — Group milestones into stages to show structure and progression
- Key milestones — Specific deliverables, decisions, or launch dates. No more than 5–7 per roadmap slide.
- Color coding — Use consistent colors for status (planned, in progress, complete) or by team/phase
- Owner or team label — Especially useful for cross-functional roadmaps
Best Roadmap Template Styles for Google Slides
Best For Project Teams
A phased bar chart style showing deliverables by month. Works best for sprint-based and waterfall planning.
Best For Marketing Teams
Campaign calendar-style roadmap with colour-coded channels. Ideal for showing quarterly content and paid media plans.
Best For Executives & Leaders
High-level strategic roadmap showing annual goals and key initiatives — no task-level detail.
Best For IT & Tech Teams
Multi-track Gantt-style layout showing infrastructure, development, and support workstreams side by side.
Sharing and Collaborating on Your Google Slides Roadmap
One of Google Slides’ biggest advantages over PowerPoint is real-time collaboration. Once your roadmap is ready:
- Click Share (top right) → add team members or paste their Google email addresses.
- Set permissions: Editor (for team members who need to update the roadmap), Commenter (for stakeholders who need to give feedback), or Viewer (for read-only access).
- Use Insert → Comment to add context or questions to specific milestone boxes without cluttering the slide design.
- To present live, click Slideshow → Present. In a remote meeting, share your screen and use keyboard shortcuts (N for next, P for previous) to navigate.
Download free Google Slides–compatible roadmap templates from SlideEgg. Professional designs, fully editable, no login required for most.
Frequently Asked Questions
Does Google Slides have a roadmap template built in?
No — Google Slides does not include a dedicated roadmap template. You can create one manually using shapes and lines, or download a free pre-designed template from SlideEgg and import it via Google Drive.
Can I use a PowerPoint roadmap template in Google Slides?
Yes. Any .pptx roadmap template from SlideEgg can be uploaded to Google Drive and opened directly in Google Slides. Most formatting, shapes, and colors will be preserved. This is the fastest way to get a professional roadmap into Google Slides.
How do I keep my Google Slides roadmap updated over time?
Treat your roadmap file in Google Drive as a living document. Share it with your team as an “Editor” and assign one owner to update milestone statuses weekly. Use color changes (e.g., grey for completed) to visually track progress without rebuilding the slide each time.