
Picture this: you have spent three hours perfecting your presentation. The fonts are right, the colours are on-brand, the data is clean. You plug into the conference room projector — and two thick black bars appear on either side of your slides. Or worse, your beautifully designed widescreen layout arrives at the printer and half your content is missing. The room is filling up. There is no time to fix it.
This happens because of one decision made — or skipped — at the very beginning: slide size. It takes under 30 seconds to set correctly. But most people either leave it at the default and hope for the best, or change it mid-design and watch their carefully positioned content scramble across the slide like it went through a blender.
This guide fixes that. You will learn exactly how to change slide size in PowerPoint — which preset to choose, when to use a fully custom size (including the 16:10 setting that MacBooks and enterprise projectors actually use), and how to switch orientation without destroying your layout. There is also a complete pro aspect ratio reference table for every screen, paper, and social media format you will ever need.
When you need this guide: Black bars on your projected slides. Content cut off when printing. A template that looks wrong on your screen. Designing for social media, posters, or A4 handouts. Presenting on a MacBook or Surface Pro. Any of these means your slide size needs attention.
Standard vs Widescreen — which should you use?
Before you touch the Design tab, you need to answer one question: what screen is this presentation actually going to be displayed on? The answer determines everything else.
Standard (4:3) — 10 × 7.5 inches Matches older projectors, standard-definition screens, and most printed paper formats. Use 4:3 when presenting on an older projector, printing A4 or letter-format handouts, or when your content has more vertical elements than horizontal.
Widescreen (16:9) — 13.33 × 7.5 inches Matches modern laptop screens, HD projectors, widescreen monitors, and television displays. The PowerPoint default since 2013 and the correct choice for the vast majority of live presentations today.
Pro tip — the 16:10 corporate standard that most guides miss While 16:9 is the standard default, many high-end enterprise projectors and modern laptops — including MacBook Pro, MacBook Air, and Microsoft Surface Pro — use a 16:10 aspect ratio, not 16:9. If you present a 16:9 slide on a 16:10 display, you will still see thin black bars at the top and bottom (letterboxing), even though the slide technically appears ‘widescreen’. The fix: For presentations in high-end conference rooms or on MacBooks and Surface Pros, set a custom slide size of 12.8 × 8 inches — this is a perfect 16:10 ratio and will fill the screen edge-to-edge on those displays with zero letterboxing. How to check: Ask your venue AV team, or look at the projector or screen model number and search its native resolution. A 1920×1200 or 2560×1600 display is 16:10. A 1920×1080 or 2560×1440 display is 16:9.
For the full technical specifications of each preset, the Microsoft slide size documentation covers pixel and centimetre equivalents for different regional paper standards.
Key rule: If you are unsure which format the venue uses, choose 16:9. It is the safe default for virtually every modern display environment. If you know the venue uses MacBooks or high-end enterprise displays, use 12.8 × 8 inches (16:10).
Method 1 — switching between standard presets
This covers the vast majority of use cases and takes under 30 seconds.
- Open your presentation Open the PowerPoint file you want to resize. If starting from scratch, open a new blank presentation.
- Go to the Design tab Click the Design tab in the ribbon at the top of the screen. This tab contains all slide layout and size customisation options.
- Click Slide Size Near the right end of the Design tab ribbon, click Slide Size. A dropdown menu appears with three options: Standard (4:3), Widescreen (16:9), and Custom Slide Size.
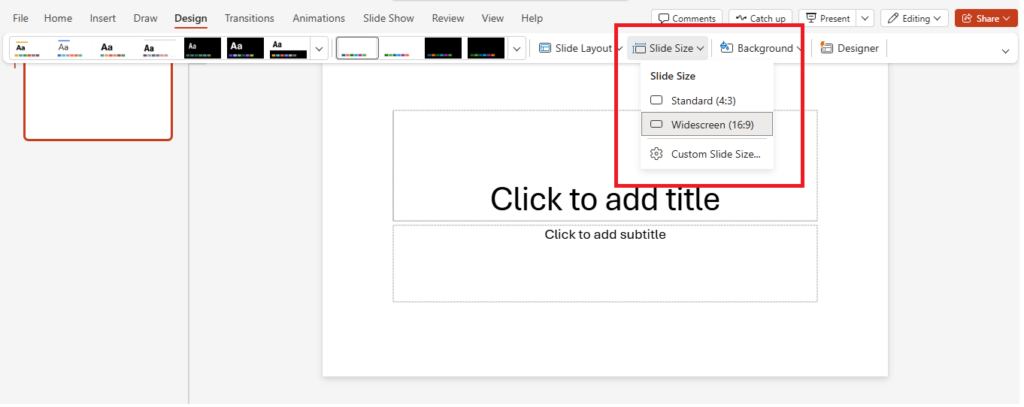
screenshot of the PowerPoint Design tab ribbon with the Slide Size button highlighted
- Select your size Click Standard (4:3) or Widescreen (16:9). PowerPoint immediately prompts you with a dialog asking how to handle existing content.
- Choose how to scale your content PowerPoint gives you two options — see the visual comparison below before deciding. For most cases, choose Ensure Fit first, then manually adjust individual elements.
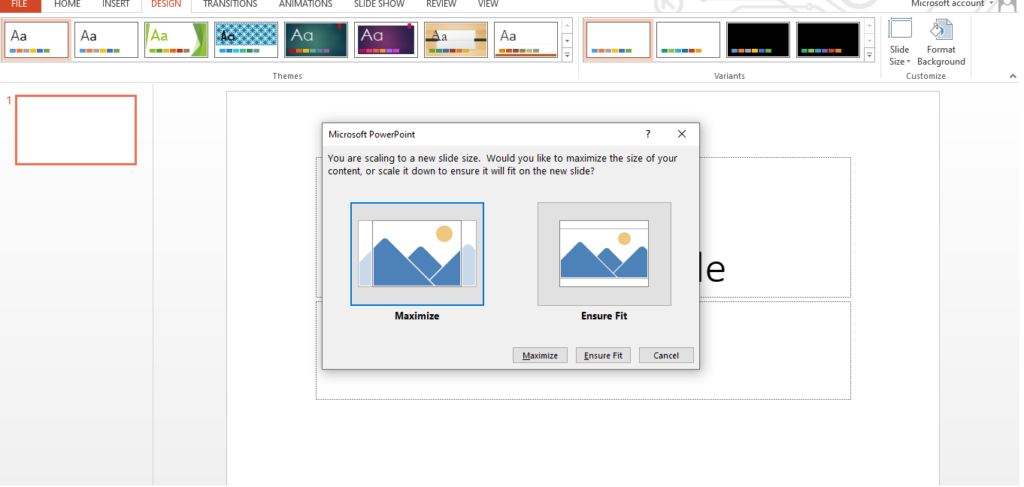
Microsoft PowerPoint’ dialog showing the two buttons: ‘Maximise’ and ‘Ensure Fit’
- Review and adjust your content Scroll through every slide and check that text has not been cut off, images are not cropped, and no elements have moved outside the slide boundary.
Tip: Always change slide size before adding content. Changing size on a fully designed presentation always requires manual content adjustment — the more slides you have, the longer it takes.
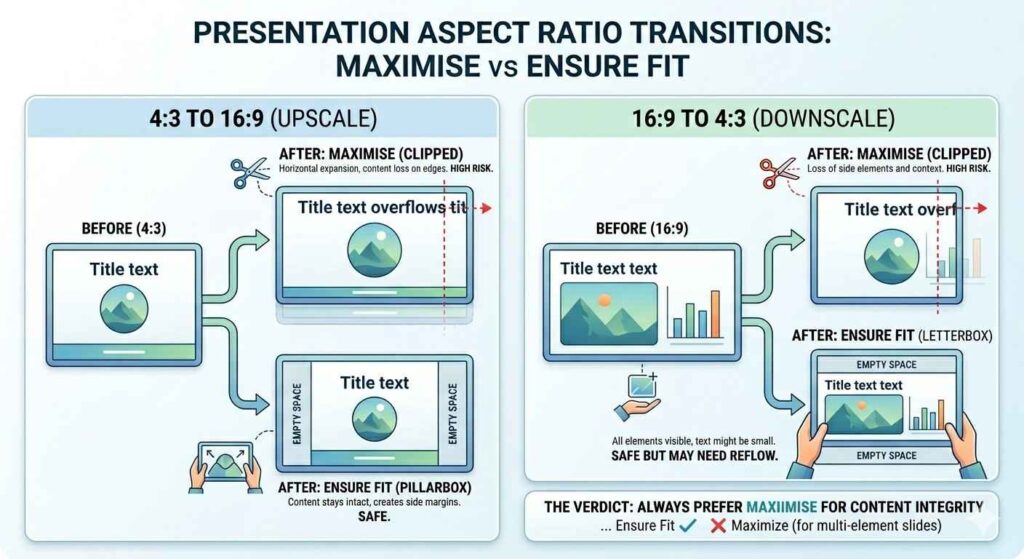
Maximise vs Ensure Fit — what actually happens to your content
This is the decision most people get wrong. Here is exactly what each option does to your slide content, described as a visual comparison.
Method 2 — setting a custom slide size
Use this method when you need specific dimensions for print, poster, social media, or non-standard displays including 16:10.
- Go to Design → Slide Size → Custom Slide Size Click the Design tab, then Slide Size, then Custom Slide Size. A dialog box opens with width, height, and orientation fields.
- Enter your dimensions Type your desired width and height. PowerPoint accepts values in inches or centimetres. See the Pro Aspect Ratio table below for exact dimensions for every common use case.
- Set orientation Choose Landscape (wider than tall) or Portrait (taller than wide). Changing orientation here swaps the width and height values automatically.
- Click OK and choose Ensure Fit Apply Ensure Fit — always the safer choice. Then manually reposition and resize elements to fill the new canvas.
Critical: check your Slide Master after every resize There is a known PowerPoint behaviour where changing slide size can incorrectly reset font sizes or bullet indentations in your Slide Master — the master template that controls the design of all slides. PowerPoint ‘guesses’ the new scaling for Master elements, and it frequently gets it wrong, producing oversized titles, misaligned bullet indents, or incorrect font weights across every slide in your deck. The fix: After every resize, go to View → Slide Master and check your title placeholder, body text placeholder, and footer sizes. If any have changed, correct them once in the Master — this fixes all slides at once rather than requiring you to fix each slide individually. Close Slide Master view (Slide Master tab → Close Master View) when done. This is especially important for branded decks with custom fonts and carefully tuned font hierarchies. A single Slide Master fix takes 2 minutes. Fixing 50 slides individually takes an hour.
Method 3 — changing orientation (landscape to portrait)
- Go to Design → Slide Size → Custom Slide Size Click the Design tab, then Slide Size, then Custom Slide Size.
- Switch orientation to Portrait Under the Slides section, click Portrait. The width and height values automatically swap.
- Reposition content for vertical space Content that was spread horizontally now needs to use vertical space. Tall images work well in portrait. Side-by-side columns usually need to be restructured as top-and-bottom layouts.
For a full guide on this specific task, see our blog on How To Change Page Orientation From Landscape To Portrait.
Mixed orientation workaround: PowerPoint does not support mixed orientations in a single file. If you need landscape and portrait slides together — for example, a widescreen title followed by a portrait handout page — create two separate .pptx files and combine them as a PDF for distribution.
Power user tip — recovering shifted content after a resize
When you change slide size on a presentation with many slides, elements frequently shift off-screen or overlap in ways that are not immediately visible. The most frustrating scenario: an element moved just beyond the slide boundary and is now invisible — but it still exists and will cause issues when you try to export or print.
The Selection Pane recovery trick (Alt + F10) Instead of hunting for off-screen elements by clicking around the slide, open the Selection Pane: press Alt + F10 (Windows) or go to Home → Arrange → Selection Pane. This opens a panel listing every object on the current slide by name — including objects that have moved completely off the visible slide area. Click any object name in the Selection Pane to select it — even if it is invisible on the slide canvas. Then use the Position fields (Shape Format → Size & Properties → Position) to type exact X and Y coordinates to move it back onto the slide. For a 50-slide deck, use this workflow: Ctrl+A on each slide to select all, then check the Selection Pane for any objects with unusual names or duplicates — these are often the elements that moved during resize.
Pro aspect ratio reference table — every use case
Use this table before you start any new presentation or when repurposing an existing deck for a different output format.
| Goal / Use case | Width | Height | Ratio | Notes |
| Standard presentation (legacy) | 10 in | 7.5 in | 4:3 | Older projectors, printed handouts |
| Widescreen presentation (default) | 13.33 in | 7.5 in | 16:9 | Modern HD projectors, monitors |
| MacBook / Surface Pro / 16:10 displays | 12.8 in | 8 in | 16:10 | Eliminates letterboxing on enterprise screens |
| Cinema / ultra-wide immersive keynote | 13.33 in | 5.7 in | 21:9 | Ultra-wide displays, immersive keynote stages |
| A4 landscape handout | 11.69 in | 8.27 in | ~4:3 | European/international print standard |
| A4 portrait document | 7.5 in | 10.83 in | ~3:4 | Portrait handouts, reports |
| US Letter portrait | 8.5 in | 11 in | ~3:4 | US print standard — reports, handouts |
| Instagram square post | 7.5 in | 7.5 in | 1:1 | Social media — square format |
| Instagram Story / TikTok / Reels | 7.5 in | 13.33 in | 9:16 | Vertical-first mobile social — fastest growing format |
| LinkedIn banner | 13.33 in | 3.5 in | Custom | Wide horizontal banner format |
| Conference poster (A1 portrait) | 23.39 in | 33.11 in | ~1:√2 | Large format print — use high-res images |
Best practices for slide size in PowerPoint
- Check your venue in advance. Before your presentation, confirm whether the projector or screen is 4:3, 16:9, or 16:10. Most venues built or upgraded after 2010 use widescreen. High-end conference rooms and Apple-device-heavy environments often use 16:10.
- Design for your output, not your screen. If you design on a 16:9 laptop but the venue has a 4:3 projector, your slides will either have black bars or be forcibly stretched. Always design at the correct size for the final output environment.
- Use high-resolution images. When increasing slide size for print or poster use, low-resolution images become visibly pixelated. For any custom size larger than standard presentation dimensions, use images of at least 300 dpi or 3000px on the longest dimension. If your file size becomes too large, see our guide on how to reduce the size of a PowerPoint presentation — it covers image compression techniques that keep quality intact while significantly cutting file size.
- Save a backup before resizing. Before changing slide size on any important presentation, do File → Save As and create a backup copy. Content repositioning after a size change can be difficult to undo cleanly if you have made multiple edits before noticing issues.
- Check Slide Master after every resize. Go to View → Slide Master and verify font sizes and bullet indentations are correct. Fix any issues there before touching individual slides.
- Use Selection Pane (Alt+F10) to find off-screen elements. After a resize, any element that shifted beyond the slide boundary is invisible but still exists. The Selection Pane shows every object on the slide regardless of whether it is visible.
For more design techniques across all your slides, visit our PowerPoint tips and design hacks page.
Need a professionally designed starting point? Browse our free PowerPoint templates — all sized correctly for modern widescreen displays and fully editable the moment you download them.
Using Google Slides? See our related guide on How to Lower the Size of a Google Slides Presentation for the platform-specific approach to slide dimensions.
Frequently asked questions
What is the default slide size in PowerPoint?
Since PowerPoint 2013, the default slide size is Widescreen 16:9 (13.33 × 7.5 inches). Earlier versions used Standard 4:3 (10 × 7.5 inches). Check by going to Design → Slide Size. If you are presenting on a MacBook or Surface Pro, consider using 12.8 × 8 inches (16:10) for a perfect fit on those screens.
How do I change slide size without distorting content?
Choose Ensure Fit when PowerPoint prompts you after changing size. This scales all content down proportionally to fit within the new boundary — nothing is cropped. After applying, manually resize and reposition important elements to fill the new canvas dimensions. Never rely on Maximise if your slide already has multiple positioned elements.
Can I have different slide sizes in the same PowerPoint presentation?
No. PowerPoint applies one slide size to all slides in a presentation. The workaround for mixed orientations or sizes is to create two separate .pptx files and merge them as a single PDF using File → Export → Create PDF/XPS in each file.
What slide size should I use for printing?
For A4 paper: 11.69 × 8.27 inches (landscape) or 7.5 × 10.83 inches (portrait). For US Letter: 8.5 × 11 inches (portrait) or 10 × 7.5 inches (landscape). Always preview in File → Print before printing a full run. Use high-resolution images (300 dpi minimum) for any print output.
How do I change PowerPoint slide size to A4?
Go to Design → Slide Size → Custom Slide Size. Set Width to 29.7 cm (11.69 inches) and Height to 21 cm (8.27 inches) for A4 landscape, or swap the values for A4 portrait. Click OK and choose Ensure Fit. These dimensions match the A4 standard used across Europe, Asia, and most of the world outside the United States.
Does changing slide size affect the file size of my presentation?
No. Changing the slide canvas dimensions does not directly affect .pptx file size. File size is determined by the resolution and number of embedded images and media files. However, if you resize to a larger format (such as a conference poster) and add high-resolution images to fill the larger canvas, the file size will increase due to the larger image files.