When you are building a complex slide an infographic, a diagram, a branded layout with multiple shapes and text boxes managing each element individually becomes slow and error-prone. Move one shape and the others drift. Resize one element and the whole arrangement falls apart. Grouping solves this entirely.
In 2026, Google Slides supports grouping via three different methods: right-click, the Arrange menu, and keyboard shortcuts. This guide covers all three in full, plus how to edit objects inside a group without ungrouping, how to create nested groups, how to group on mobile, and the situations where grouping makes the biggest difference to your workflow.
Quick start fastest paths
- Group: Select 2+objects →
Ctrl+Alt+G(Windows) /Cmd+Option+G(Mac) - Ungroup: Click group →
Ctrl+Alt+Shift+G(Windows) /Cmd+Option+Shift+G(Mac) - Edit inside group: Double-click the group → click individual object
- Select all objects: Click slide background →
Ctrl+A/Cmd+A
Why grouping objects matters in Google Slides
Google Slides slides are built from layers of independent objects shapes, text boxes, images, lines, icons. Each one sits in its own layer and moves independently. This gives you flexibility, but it creates a management problem: the more objects on a slide, the harder it is to keep them aligned and move them together without accidentally shifting individual elements.
Grouping solves three specific problems:
- Moving complex arrangements. A grouped infographic with 15 shapes moves as one click-and-drag. Ungrouped, repositioning 15 objects takes 15 separate drags and rarely ends up aligned correctly.
- Proportional resizing. Resizing a group scales all objects inside proportionally, maintaining their relative sizes and positions. Resizing ungrouped objects individually is almost impossible to do consistently by eye.
- Applying uniform formatting. Changing the opacity, border, or shadow of a group affects the entire group simultaneously a 10-second task that would otherwise require clicking each object individually.
Understanding when to group and when not to is one of the most impactful workflow skills in Google Slides.
How to select multiple objects in Google Slides
Before you can group objects, you need to select them. There are three ways to do this in 2026:
- Click and drag (marquee selection). Click on an empty area of the slide and drag to draw a selection rectangle. Any object the rectangle touches is selected. This is the fastest method when objects are close together.
- Shift+click. Click the first object to select it, then hold Shift and click each additional object. Use this when the objects you want are scattered across the slide and a drag selection would accidentally include unwanted objects.
- Ctrl+A / Cmd+A. Selects all objects on the slide at once. Useful as a starting point then hold Shift and click any objects you want to deselect before grouping.
Watch out for layout placeholders. When you press Ctrl+A, Google Slides selects everything including the slide’s default title and content placeholder boxes. These cannot be grouped with other objects. If the Group option is greyed out after Ctrl+A, hold Shift and click the placeholder text boxes to deselect them, then try grouping again.
Method 1 Group using right-click
The right-click method is the most intuitive no menu navigation or memorized shortcuts needed.
- Select your objects using any of the selection methods above. A blue selection border appears around each selected object.
- Right-click on any one of the selected objects. The context menu appears.
- Click Group. All selected objects immediately combine into a single grouped unit one selection border appears around the outside of the entire group, and the individual object handles disappear.
Confirm the group worked: After grouping, click somewhere else to deselect, then click the group once. You should see a single set of resize handles around the entire group not individual handles on each object. If individual handles appear, the objects are not grouped.
Method 2 Group using the Arrange menu
The Arrange menu gives you access to grouping through the top menu bar useful if right-clicking is awkward on your device or trackpad.
- Select your objects using click-and-drag or Shift+click.
- Click Arrange in the top menu bar.
- Hover over Group objects in the dropdown.
- Click Group. The objects combine into a single group instantly.
The Arrange menu also gives you access to the full grouping toolkit from one place Group, Ungroup, and Regroup are all available here. Regroup is particularly useful: after you ungroup, edit individual objects, and want to restore the group, Regroup recreates the same grouping without you needing to reselect all the objects.
Method 3 Group using keyboard shortcuts
Keyboard shortcuts are the fastest method for users who group objects regularly. No clicking through menus just select and press.
Ctrl + Alt + G Group selected objects Windows & Chromebook
Cmd + Option + G Group selected objects Mac
Ctrl + Alt + Shift + G Ungroup selected group Windows & Chromebook
Cmd + Option + Shift + G Ungroup selected group Mac
Full keyboard workflow: Click first object → Shift+click remaining objects → Ctrl+Alt+G to group → reposition the group → Ctrl+Alt+Shift+G to ungroup if needed. This workflow lets you manage complex slide layouts without touching your mouse once you’ve made the initial selection.
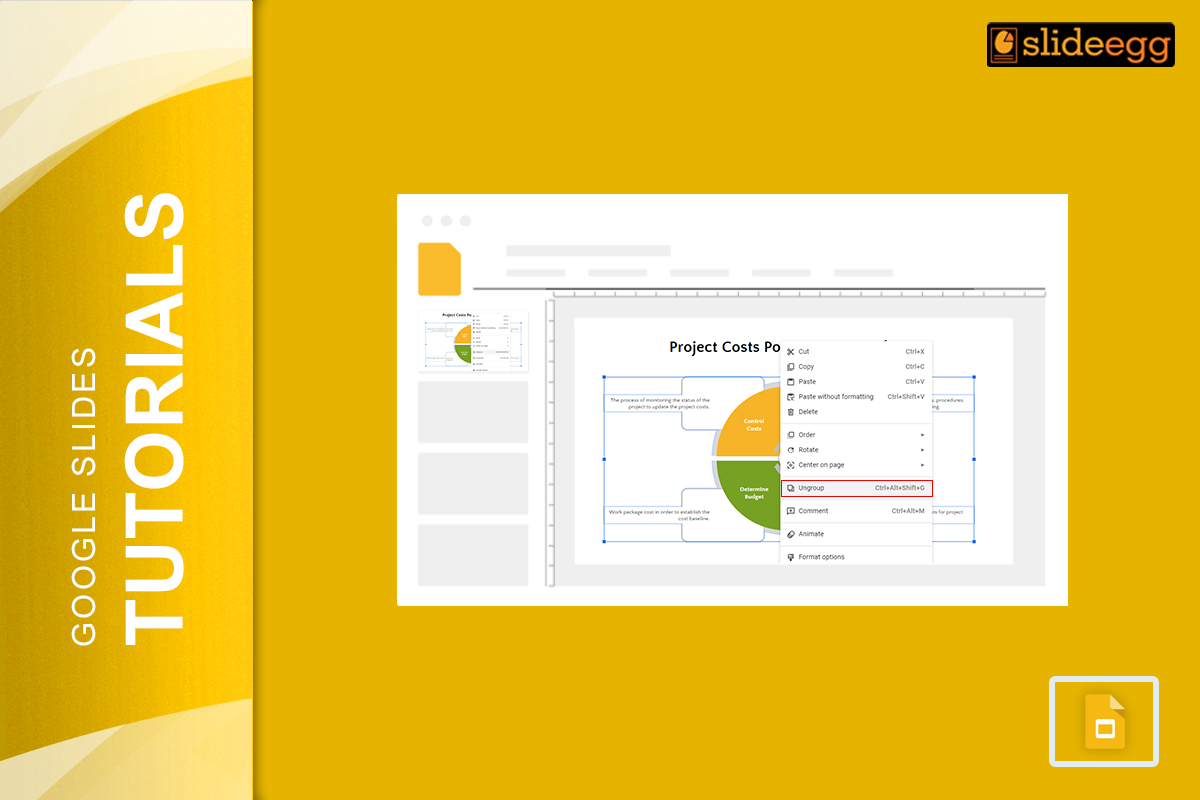
How to ungroup objects in Google Slides
Ungrouping reverses the grouping and returns all objects to their individual, independently moveable state. Three methods work identically to grouping:
| Method | Steps |
|---|---|
| Right-click | Click the group → right-click → Ungroup |
| Arrange menu | Click the group → Arrange → Group objects → Ungroup |
| Keyboard shortcut | Click the group → Ctrl+Alt+Shift+G (Windows) / Cmd+Option+Shift+G (Mac) |
After ungrouping, objects may shift slightly if they were positioned relative to the group boundary. Before ungrouping, note the position of your group (right-click → Format options → Position) so you can reposition individual objects accurately if needed.
How to edit an object inside a group without ungrouping
One of the most useful and underused features of grouping in Google Slides is the ability to edit individual objects inside a group without breaking the group apart.
- Click the group once to select the whole group.
- Double-click the group. You enter the group’s edit mode a dashed border replaces the solid selection border, and individual objects inside become independently selectable.
- Click the specific object you want to edit. It gets its own selection handles.
- Make your changes. resize it, recolor it, edit its text, change its border, whatever you need.
- Click outside the group boundary to exit edit mode. The group remains intact with all your changes applied.
Edit text inside a grouped text box: Double-click the group to enter it, then double-click the specific text box inside the group. A text cursor appears and you can type, select, and format text normally. Click outside when done.
How to create nested groups
A nested group is a group inside another group useful when building complex diagrams or infographics where some sub-elements need to move together as a unit, but also need to move as part of a larger whole.
- Create your first group: select objects → group them (any method).
- Select the first group plus additional objects you want in the outer group (Shift+click).
- Group the selection. You now have a group containing the first group plus the new objects.
To ungroup nested groups, you must ungroup one level at a time. The first ungroup breaks the outer group; the inner group remains intact. Ungroup again to break the inner group.
Practical nested group example: Build a chart legend where each legend item (colored square + label text) is its own group. Then group all legend items together into one outer group. Moving the legend moves everything. Editing one label means double-clicking twice, once into the outer group, once into the inner item group.
Grouping on mobile (Google Slides app)
The Google Slides app for iOS and Android supports basic grouping, though the workflow differs from desktop.
- Open your presentation and tap the slide you want to edit.
- Tap the first object to select it.
- Tap and hold briefly, then tap additional objects to add them to the selection. A blue border appears around each selected object.
- Tap the three-dot menu (⋮) in the top right corner.
- Tap Group from the menu. The objects combine into a single group.
- To ungroup, tap the grouped object, tap the three-dot menu, and choose Ungroup.
Mobile limitations: Keyboard shortcuts are not available on mobile. Nested group editing (double-clicking into a group) is also more limited on the app. For complex grouping operations, use the desktop browser version of Google Slides for full control.
When to group and when not to: practical use cases in 2026
| Situation | Group? | Why |
|---|---|---|
| Infographic with 10+ shapes | ✓ Yes | Move and resize the whole infographic as one unit |
| Icon + label pairs in a list | ✓ Yes | Keeps each icon aligned with its label when repositioning |
| Logo made of multiple shapes | ✓ Yes | Treat the logo as a single object across all slides |
| Chart + caption + source line | ✓ Yes | Move the chart block without losing the caption alignment |
| Single text box | ✗ No | No benefit grouping one object does nothing |
| Objects you are still editing frequently | ✗ Wait | Group after the design is finalised to avoid repeated ungroup/regroup cycles |
| Slide layout placeholders | ✗ No | Cannot be grouped Google Slides does not support this |
Best practices for grouping in Google Slides in 2026
- Group after finalising design, not before. Grouping while you are still actively editing individual objects creates unnecessary ungroup/regroup cycles. Complete the design of each element first, then group when the layout is settled.
- Use Regroup after ungrouping. When you need to temporarily ungroup to edit one object, use Arrange → Group objects → Regroup to restore the original group. This is faster and more accurate than reselecting all objects and regrouping manually.
- Double-click before ungrouping. Before committing to a full ungroup, try double-clicking into the group to edit individual objects. In most cases, this avoids the need to ungroup entirely.
- Group slide decorations separately from content. Background shapes and decorative elements (borders, accent bars, background icons) should be grouped separately from content elements. This lets you move decorations and content independently without disrupting the other.
- Name groups for complex slides. Right-click a group → Alt text → add a descriptive name. This makes it much easier to identify groups in the Tab order panel (used for accessibility and keyboard navigation) when a slide has many grouped objects.
- Lock groups you won’t move again. There is no native lock function in Google Slides, but you can simulate it by setting a group’s position precisely in Format options and noting the coordinates. If it gets accidentally moved, you can restore it to the exact position.
Start with professionally grouped layouts
Building well-grouped slide layouts from scratch takes time. SlideEgg’s library of free Google Slides templates includes professionally designed decks where elements are already grouped logically: infographics, diagrams, and icon sets are pre-grouped and ready to customize. You can apply any of the grouping techniques above to reorganize them for your specific needs.
For more Google Slides formatting techniques, visit our Google Slides presentation tips and design tricks.
Frequently asked questions
Why can’t I group objects in Google Slides?
The Group option only appears when two or more objects are selected. If it is greyed out, check: (1) you have selected at least two objects; (2) none of the selected objects are slide layout placeholders these cannot be grouped; (3) you have Editor access to the file; (4) objects inside tables cannot be grouped. Deselect any placeholders by Shift+clicking them, then try grouping the remaining selection.
Can I group different types of objects together in Google Slides?
Yes you can group any combination of shapes, text boxes, images, icons, lines, and arrows. The only exceptions are slide layout placeholders (default title and content boxes) and objects inside tables. Any object you insert yourself via Insert → Shape, Image, Text box, or Line can be grouped freely with any other inserted object.
How do I select all objects on a slide at once in Google Slides?
Click anywhere on the slide background outside any object, then press Ctrl+A (Windows) or Cmd+A (Mac) to select everything. If the Group option is then unavailable, hold Shift and click any layout placeholder text boxes to deselect them, then try grouping the remaining selection.
Can I edit one object inside a group without ungrouping in Google Slides?
Yes double-click the group to enter edit mode. Individual objects inside become selectable. Click the specific object you want to edit and make your changes. Click outside the group boundary to exit. The group remains intact. This is more efficient than ungrouping, editing, and regrouping for most edits.
What is the keyboard shortcut to group objects in Google Slides?
Ctrl+Alt+G on Windows and Chromebook, Cmd+Option+G on Mac. To ungroup: Ctrl+Alt+Shift+G on Windows and Chromebook, Cmd+Option+Shift+G on Mac. Both require at least two objects selected first. These are the fastest methods for frequent grouping operations.
Can I group objects in Google Slides on iPhone or Android?
Yes. Tap the first object, then tap additional objects to multi-select. Tap the three-dot menu (⋮) in the top right and choose Group. To ungroup, tap the group, tap the three-dot menu, and choose Ungroup. Keyboard shortcuts and the Arrange menu are not available on mobile for complex operations use the desktop browser version.
Does grouping objects in Google Slides affect their individual formatting?
No grouping preserves each object’s individual formatting. Each retains its own color, border, font, size, and effects. Formatting applied to the group as a whole (such as opacity) affects the group container without changing individual object styles. To change one object’s formatting inside a group, double-click the group, click the object, and edit it directly.