You’ve built your slide. The content is solid. But something still feels off — and more often than not, it comes down to color.
Shapes in Google Slides aren’t just decorative. They frame your message, guide your audience’s eye, and signal whether your presentation is polished or rushed. Changing a shape’s color takes under 30 seconds — but knowing which color method to use (solid fill, gradient, or border-only) is what separates a forgettable slide from one that actually lands.
This guide walks you through 3 ways to customize shape colors in Google Slides, along with practical tips for choosing the right colors for any presentation style.
Why Shape Color Matters in Google Slides
Before diving into the steps, it’s worth understanding why this matters:
- Brand consistency: Matching shape colors to your brand palette makes slides look professionally designed, not assembled from defaults.
- Readability: A shape with poor color contrast makes overlaid text hard to read — especially on projected screens.
- Audience attention: Color directs focus. A highlighted shape in a contrasting color naturally draws the eye to the most important point on the slide.
- Tone signaling: Bright, saturated colors feel energetic and casual. Muted, desaturated tones feel corporate and trustworthy. The wrong choice undermines your message before you’ve said a word.
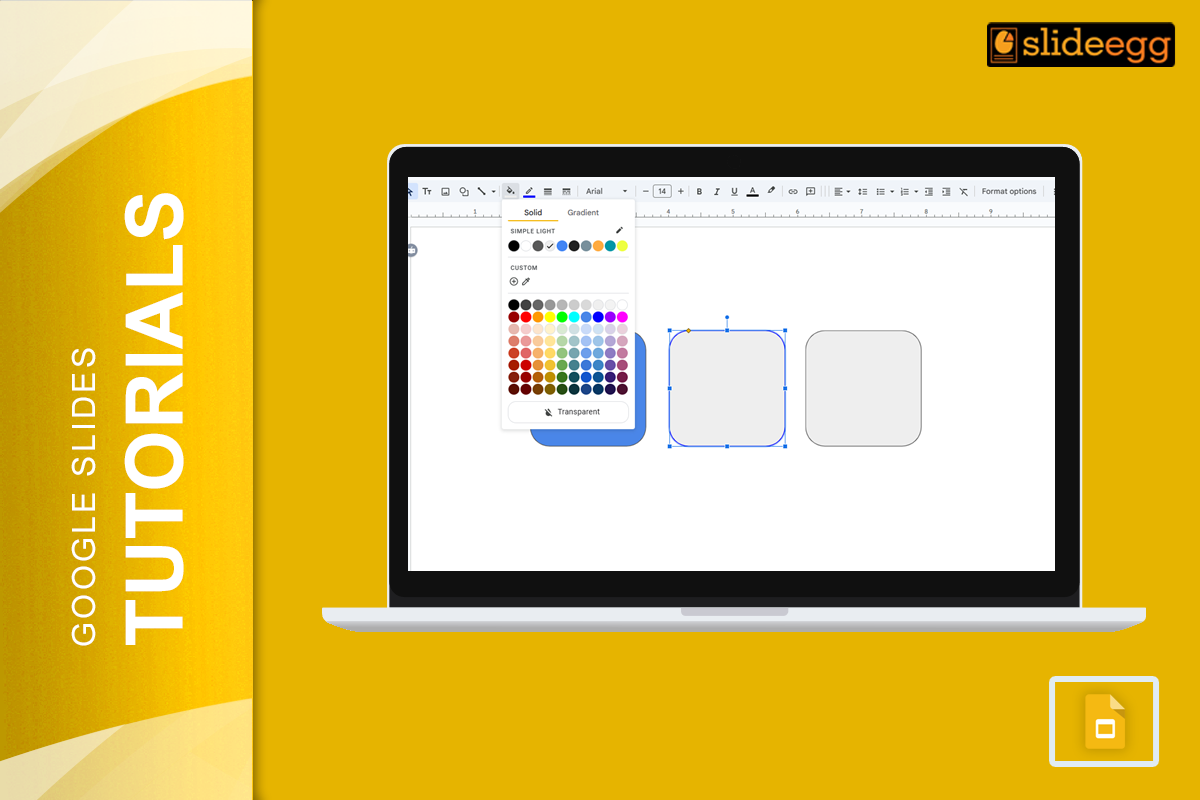
Method 1: Change the Fill Color of a Shape
This is the most common approach — changing the solid background color of any shape.
Step 1: Open your presentation in Google Slides and navigate to the slide containing your shape. If you haven’t added a shape yet, go to Insert → Shape → Shapes and choose one from the menu.
Step 2: Click the shape to select it. You’ll see a blue selection outline appear around it.
Step 3: In the toolbar at the top of the screen, click the Fill Color icon — it looks like a paint bucket with a color bar underneath it.
Step 4: A color panel will appear. You can:
- Pick from the theme colors or standard colors in the palette
- Click Custom to enter a specific hex code (e.g., #FF6B35 for a warm orange)
- Click Transparent to remove the fill entirely (useful for outline-only shapes)
Step 5: Your shape updates instantly. If you don’t like the result, press Ctrl + Z (Windows) or Cmd + Z (Mac) to undo.
Pro tip: Use your brand’s hex codes for consistency. To find your brand colors, check your company style guide or ask your design team for the official palette.
Method 2: Add a Gradient Fill to a Shape
Solid colors work well, but gradients add depth and visual polish — ideal for hero slides, title cards, or accent shapes.
Step 1: Select the shape and right-click it, then choose Format options from the context menu.
Step 2: In the Format options panel on the right, click Fill to expand it.
Step 3: Select Gradient from the dropdown. You’ll see options for:
- Direction: Linear (left to right, top to bottom, diagonal) or Radial (center outward)
- Color stops: Click each stop to set its color and adjust its position along the gradient
Step 4: Experiment with two complementary colors for a clean look — for example, a dark navy fading into a lighter blue, or a warm coral fading into soft gold.
Step 5: Close the Format options panel. Your shape now has a gradient fill.
Pro tip: Keep gradients subtle. A difference of 2–3 shades within the same color family looks polished; a jarring rainbow gradient looks amateur.
Method 3: Change the Border Color of a Shape
Sometimes you want an outline-only shape, or you want to add a colored border to complement your fill. Here’s how:
Step 1: Select the shape.
Step 2: In the toolbar, click the Border Color icon — it looks like a pencil with a color line underneath it.
Step 3: Choose a color from the palette or enter a custom hex code.
Step 4: To adjust the border thickness, click the Border weight icon (next to the border color icon) and choose a size — typically 1–3pt looks clean; anything above 4pt starts to feel heavy.
Step 5: To remove the border entirely, select Transparent in the border color menu.
Pro tip: For a clean, minimal aesthetic, use a border-only shape (transparent fill + colored border) rather than a solid fill. This works especially well for framing images or callout boxes.
How to Adjust Shape Opacity
If you need a shape to sit behind content without overwhelming it — for example, as a background accent — reducing its opacity is the cleanest approach.
Step 1: Right-click the shape and choose Format options.
Step 2: Under Fill, look for the Transparency slider.
Step 3: Drag it right to increase transparency (making the shape more see-through) or left to make it more opaque.
A shape at 70–80% transparency is a great way to add subtle color to a slide background without distracting from the text above it.
Color Selection Tips for Google Slides
Getting the color right matters as much as knowing how to apply it. A few practical rules:
Stick to a 3-color palette. Pick a primary color, a secondary accent, and a neutral (white, light gray, or off-white). Applying these consistently across all slides creates a cohesive, designed look.
Check contrast for text-over-shape situations. If you’re placing text on top of a colored shape, make sure the contrast ratio is readable. A quick rule: white text on shapes darker than #5A5A5A, black text on shapes lighter than #C0C0C0. For accessibility, use Google’s Accessibility Checker or a third-party contrast tool.
Match color temperature to your presentation tone. Warm colors (reds, oranges, yellows) feel urgent and energetic — good for sales decks and product launches. Cool colors (blues, greens, grays) feel calm and trustworthy — better for reports, proposals, and academic presentations.
Use your brand colors. If you’re presenting on behalf of a company or organization, use your official brand hex codes. Consistent use of brand colors signals professionalism and builds recognition.
Save Time with Free Google Slides Templates
If you want slides where colors, shapes, and layouts are already professionally matched — browse SlideEgg’s free Google Slides templates. Each template is fully editable, so you can apply any of the color methods above to customize it to your brand or presentation style.
You can also explore free PowerPoint templates if you’re working across both tools.
Frequently Asked Questions
Can I apply a color change to multiple shapes at once in Google Slides?
Yes. Hold Shift and click each shape to select multiple at once, then apply your fill or border color change — it updates all selected shapes simultaneously.
How do I match a color exactly from another element on my slide?
Google Slides doesn’t have a built-in eyedropper for sampling colors from the slide. The workaround: use the Custom color option and manually enter the hex code of the color you want to match.
Why does my shape color look different when projected?
Projectors and monitors often display colors differently — projectors tend to wash out lighter shades and oversaturate bright ones. Test your slides on the actual display before presenting, or use high-contrast color combinations that hold up under different lighting conditions.
Can I save my custom colors in Google Slides?
Yes. Custom colors you create are saved in the Custom section of the color panel for that specific presentation file. They don’t carry over to other presentations automatically.
Is there a way to copy a shape’s color and apply it to another shape?
Yes — use Format paint (the paint roller icon in the toolbar). Click the shape whose formatting you want to copy, click the Format paint icon, then click the target shape. This copies fill color, border color, and other formatting in one step.
Does Google Slides support hex codes for shape colors?
Yes. In the custom color picker, you can enter any 6-digit hex code directly. This is the most reliable way to match specific brand colors or use colors from a design system.
Wrapping Up
Changing shape colors in Google Slides is straightforward — but using the right method makes a real difference. Solid fills work for most use cases. Gradients add depth to key slides. Border-only shapes create clean, minimal accents. And opacity gives you flexibility when layering shapes over content.
Take 5 minutes on your next presentation to audit your shape colors. Do they match your theme? Is the contrast readable? Are you using 2–3 colors consistently, or 8 different shades that don’t work together?
Small color decisions compound. Get them right, and your whole presentation feels more intentional.
Ready to skip the setup? Browse SlideEgg’s free Google Slides templates — every template is color-coordinated and ready to customize in minutes.
For more tips, check out our Google Slides presentation tips and design tricks.