
| Quick Tips: Naming Slides in Google Slides ✅ Add a text box at the top or bottom of each slide for names. ✅ Use speaker notes to write slide names and descriptions. ✅ Create a title slide template with a consistent naming style. ✅ Keep names short and easy to read (under 20 characters). ✅ Use consistent fonts and colors for slide names. ✅ Place names in the same spot on every slide. |
Introduction
Most people think slide names don’t matter much. But here’s a fact that might surprise you: 74% of presenters waste 15-20 minutes just looking for the right slide during their presentation.
Good slide names can save you time and stress. They help you stay organized and make your workflow better. When you name your slides properly, you can find any slide in seconds. You can also share your work with others easily. Your team members will thank you for clear slide names.
Google Slides doesn’t have a built-in “rename slide” feature like other presentation tools. This doesn’t mean you can’t organize your slides well. There are smart workarounds that work even better. When you learn these simple tricks, you can make your slides easy to find and navigate. Let’s explore the best ways to name and organize your Google Slides.
Why Google Slides Doesn’t Have Direct Slide Naming
Google Slides focuses on simplicity and collaboration. Unlike PowerPoint, it doesn’t show slide names in the sidebar. Instead, it shows small thumbnails of each slide. Google designed it this way to keep the interface clean and easy to use. But don’t worry. There are several effective ways to add names and organize your slides.
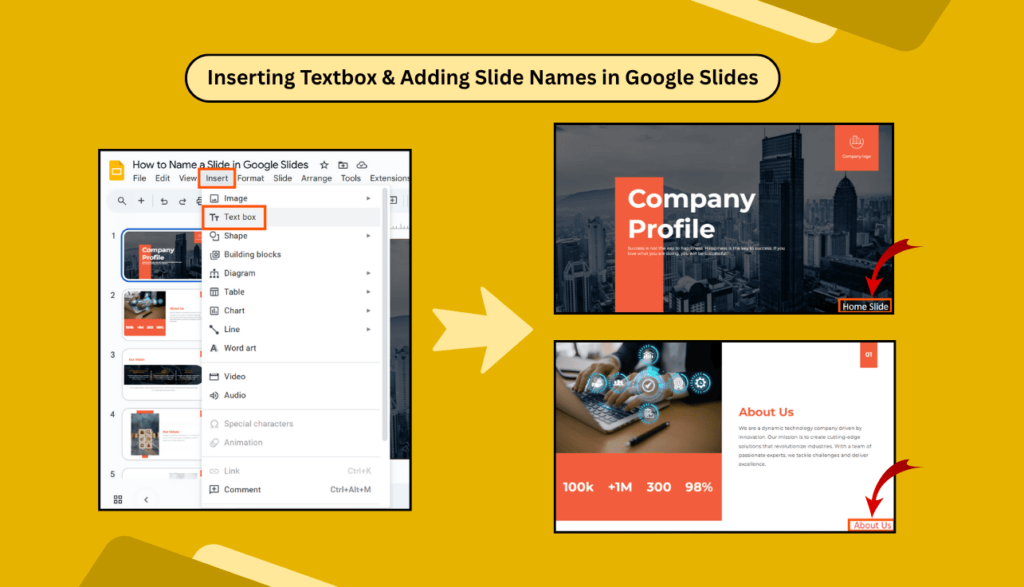
Method 1: Using Text Boxes for Slide Names
This is the most popular way to name slides in Google Slides.
Step-by-Step Instructions:
- Open your Google Slides presentation.
- Click on the slide you want to name.
- Go to Insert menu → Click “Text box”.
- Draw a small text box at the top or bottom of your slide.
- Type your slide name (like “Introduction” or “Budget Overview”).
- Make the text small and choose a light color.
- Position it in a corner where it won’t interfere with your content.
- Repeat for all slides.
Pro Tips for Text Box Method:
- Use the same font size (usually 10-12 points).
- Choose a gray or light blue color.
- Place names in the same corner on every slide.
- Keep names short and clear.
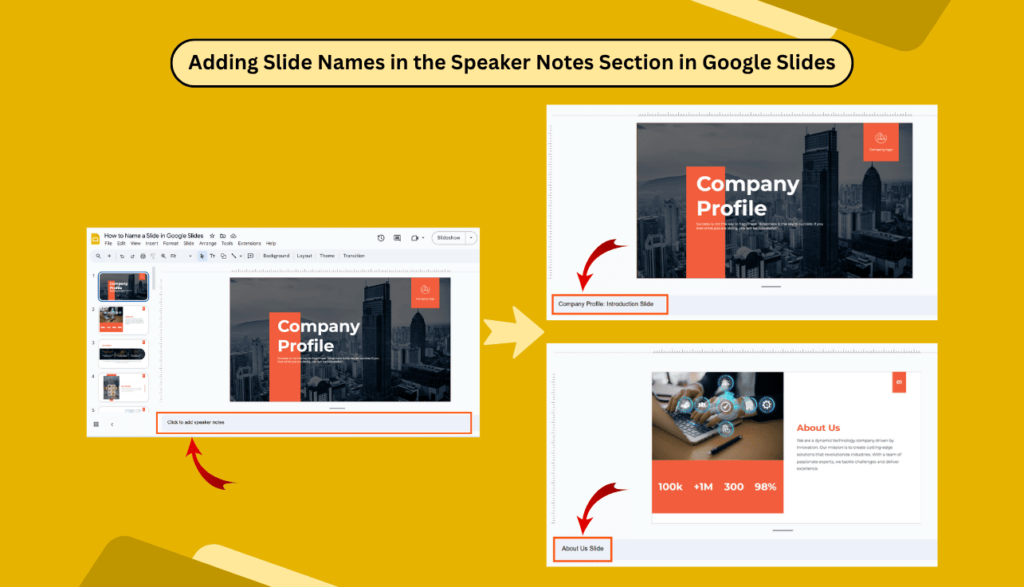
Method 2: Using Speaker Notes for Slide Organization
Speaker notes are perfect for keeping slide information organized.
How to Use Speaker Notes:
- Click on any slide.
- Look at the bottom of your screen for “Speaker notes”.
- Click “Speaker notes” to expand the section.
- Type your slide name and description.
- Add any important notes about the slide content.
- Use this space to plan what you’ll say.
Benefits of Speaker Notes Method:
- Hidden from the audience during the presentation.
- Can include detailed descriptions.
- Helps with presentation planning.
- Easy to search through later.
Method 3: Creating a Navigation Slide
Make a table of contents slide that lists all your slide names.
Steps to Create Navigation:
- Add a new slide at the beginning of your presentation.
- Title it “Agenda” or “Overview”.
- List all your slide names with page numbers.
- Update this list when you add or remove slides.
- Use this slide to jump to different sections.
Method 4: Using Slide Titles as Names
The simplest method is to use clear, descriptive titles on each slide.
Best Practices:
- Make titles large and clear.
- Use consistent formatting.
- Keep titles short but descriptive.
- Place titles in the same spot on each slide.
Good Title Examples:
- “Our Company Goals”
- “2024 Sales Results”
- “Marketing Strategy”
- “Budget Breakdown”
- “Next Steps”
Creative Workarounds for Better Organization
Color-Coding System
Use different background colors or borders to group related slides:
- Blue slides for introduction
- Green slides for the main content
- Red slides for conclusions
Numbering System
Add numbers to your slide titles:
- “1. Welcome Message”
- “2. Company Overview”
- “3. Product Features”
- “4. Pricing Plans”
Section Dividers
Create special slides that act as section headers:
- Use large, bold text
- Different background color
- Simple design
- Clear section names
Managing Large Presentations
For Long Presentations (20+ slides):
- Create Master Slides: Design template slides with name areas built in.
- Use Consistent Layout: Keep slide names in the same place throughout.
- Group-Related Content: Put similar topics together and label the groups.
- Add Progress Indicators: Show which section people are viewing.
For Team Presentations:
- Set Naming Rules: Agree on how everyone will name their slides.
- Use Shared Templates: Create templates with name areas already set up.
- Regular Reviews: Check that all slides follow the naming system.
Tips for Different Types of Presentations
| Business Presentations | Educational Lessons | Sales Pitches |
| 1. Executive Summary | 1. Today’s Learning Goals | 1. Customer Pain Points |
| 2. Problem Statement | 2. Key Concepts | 2. Our Product Demo |
| 3. Our Solution | 3. Real-World Examples | 3. Key Benefits |
| 4. Implementation Timeline | 4. Practice Time | 4. Success Stories |
| 5. Budget Requirements | 5. What We Learned | 5. Pricing Options |
| 6. Expected Results | 6. Homework Assignment | 6. FAQs |
| 7. Questions & Discussion | 7. Extra Resources | 7. Ready to Start? |
Accessibility and Professional Benefits
Why Slide Names Matter:
- Screen Readers: Text-based names help visually impaired users navigate.
- Team Collaboration: Clear names help team members understand the slide’s purpose.
- Presentation Flow: Named slides help you stay on track while presenting.
- Easy Updates: You can quickly find and edit specific content.
- Professional Image: Well-organized presentations look more polished.
Common Challenges and Solutions
Challenge: Text boxes make slides look messy.
- Solution: Use a very small font and light colors that blend in.
Challenge: Hard to see slide names in the thumbnail view.
- Solution: Use the speaker notes method or navigation slide.
Challenge: Inconsistent naming across team members.
- Solution: Create a naming template and share it with everyone.
Challenge: Names get in the way of slide content.
- Solution: Place names in the margins or use speaker notes.
Best Practices Summary
Do These Things:
- Keep names short and clear.
- Use consistent placement.
- Choose readable fonts.
- Update names when content changes.
- Test different methods to find what works best.
Avoid These Mistakes:
- Making names too long.
- Using fancy fonts that are hard to read.
- Placing names where they block important content.
- Forgetting to name new slides.
- Using confusing abbreviations.
Frequently Asked Questions
Q: Can I add slide names that show in the sidebar like PowerPoint?
A: No, Google Slides doesn’t have this feature. You need to use the workarounds mentioned above.
Q: Will my slide names show during the presentation?
A: Only if you use text boxes. Speaker notes remain hidden from the audience.
Q: Can I search for slides by name in Google Slides?
A: You can use Ctrl+F to search for text within slides, including names you’ve added.
Q: What’s the best method for naming slides?
A: It depends on your needs. Text boxes work well for visual reference, while speaker notes are great for detailed organization.
Q: Can I copy slide names to other presentations?
A: Yes, if you use text boxes or copy slides with their speaker notes.
Q: Do slide names affect presentation file size?
A: Text-based names have minimal impact on file size.
Conclusion
While Google Slides doesn’t have a direct slide naming feature, these workarounds give you even more flexibility. You can choose the method that works best for your presentation style and audience needs.
Start with simple text boxes if you want visible names. Use speaker notes for detailed organization. Create navigation slides for complex presentations. The key is finding a system that works for you and sticking with it.
Good slide organization makes you look professional and helps your audience follow along. Take a few minutes to name your slides properly. Your next presentation will be smoother and more effective.