| 🟢 Quick Steps to Align Paragraphs, Headings & Bullet Points ✅ Click on the text box you want to fix. ✅ Choose alignment: left, center, right, or justify. ✅ Use the Format > Align & Indent menu. ✅ Drag using guides or gridlines. ✅ Use Arrange > Align for multiple items. ✅ Turn on Snap to grid for clean placement. ✅ Adjust line spacing & indentation for bullet points. |
“Good alignment isn’t just about looks—it brings balance and focus.”
When you create a slide, the way your text is placed makes a big difference. The neatly aligned text helps your slides look clean, simple, and professional. If the text is all over the place, your message can get lost—even if your idea is great.
A messy slide makes your audience work harder to understand your point. A clean, well-aligned one? It delivers the message with ease. Google Slides has simple tools that help you align everything—from headings to bullet points—without any stress.
Let’s make your text look neat, sharp, and ready to shine.
Why Text Alignment Matters in Google Slides
Think of alignment like a straight road. When everything is in line, it’s easy to follow. But if it’s zig-zagged, it’s hard to drive on. Slides work the same way.
Aligned text:
- Makes your message clear.
- Helps your audience focus.
- Highlights key ideas.
- Feels balanced and well-designed.
- Makes your slides look nice and clean.
- Gives a professional touch, even to school projects.
Whether it’s a class presentation or a business meeting, alignment matters!
How to Align Text in Google Slides — Step-by-Step
Here’s how you can fix everything from small text shifts to whole paragraph placements.
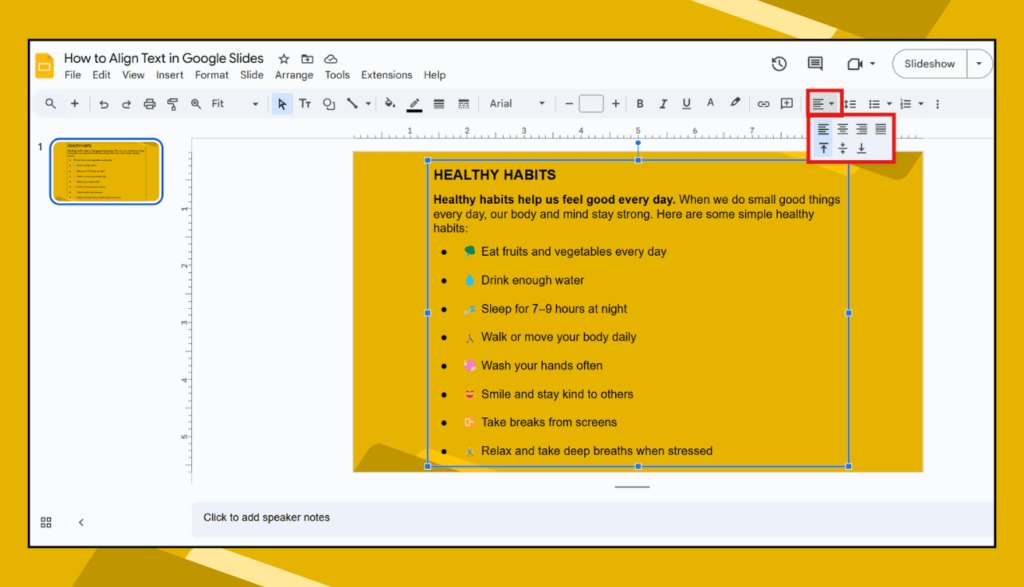
1. Click on the Text Box
First, click the box that holds your text. You’ll see a blue outline when it’s selected.
2. Use the Alignment Toolbar
At the top, you’ll find icons with lines—these help align your text inside the box:
- 🡸 Left align
- 🡺 Right align
- ☰ Center align
- 📰 Justify (makes both sides straight)
Click the one that fits your style. For most slides, center or left alignment works best.
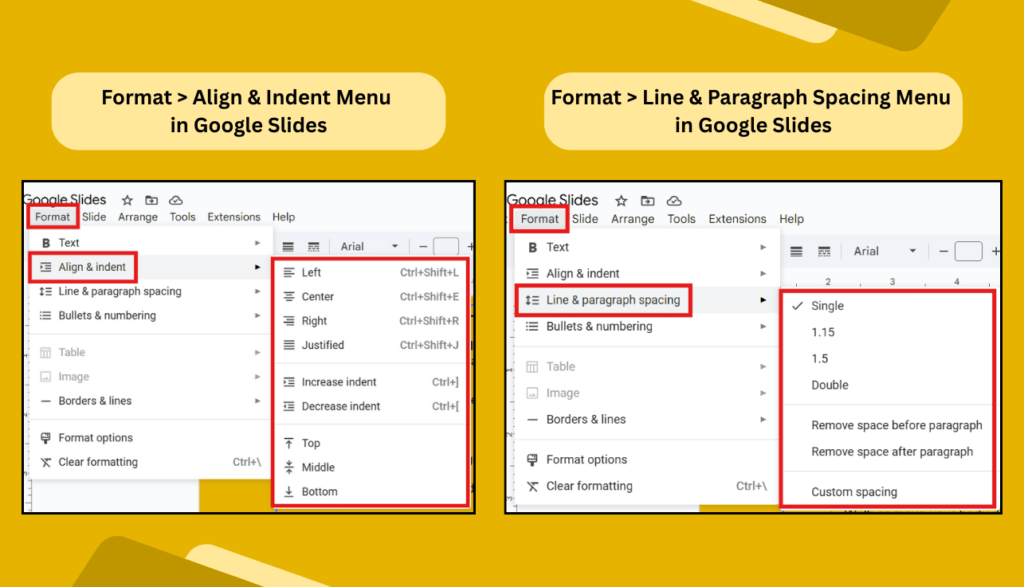
3. Format Paragraphs and Headings
Go to:
- Format > Align & Indent > Alignment
Here, you can:
- Align text left, center, or right.
- Adjust indentation (great for nested bullet points).
- Add or reduce line spacing for better readability.
🔎 Pro tip: Use 1.15 to 1.5 line spacing for paragraph text. It looks cleaner and is easier to read.
4. Align Bullet Points Perfectly
Bullet lists often get messy. Here’s how to clean them up:
- Select the list.
- Go to Format > Align & Indent > Indentation options.
- You’ll see options to set the left margin and bullet indent.
- Keep bullet indent around 0.5″ for neat spacing.
Use consistent bullet formatting across slides for a uniform look.
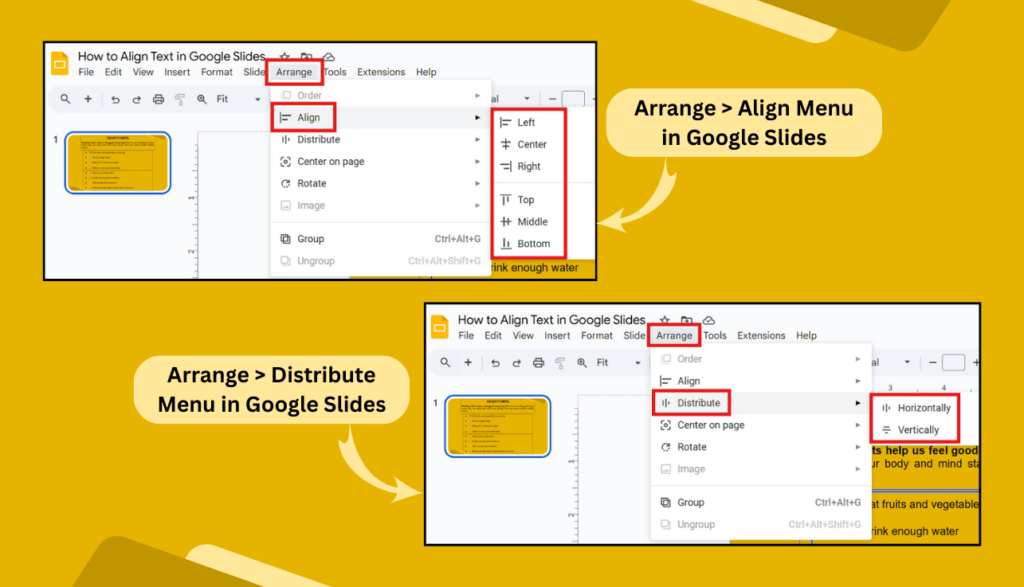
5. Align Multiple Text Boxes or Objects
Want to match up different text boxes, images, or shapes?
- Hold Shift and click on each item you want to align.
- Go to Arrange > Align.
- Choose:
- Left
- Center
- Right
- Top
- Middle
- Bottom
Then go to Arrange > Distribute to space them out evenly (horizontally or vertically).
6. Turn on Guides and Grids
To make things line up just right, go to:
- View > Guides > Show guides.
and
- View > Snap to > Snap to grid.
These invisible helpers will keep everything neat as you move items around.
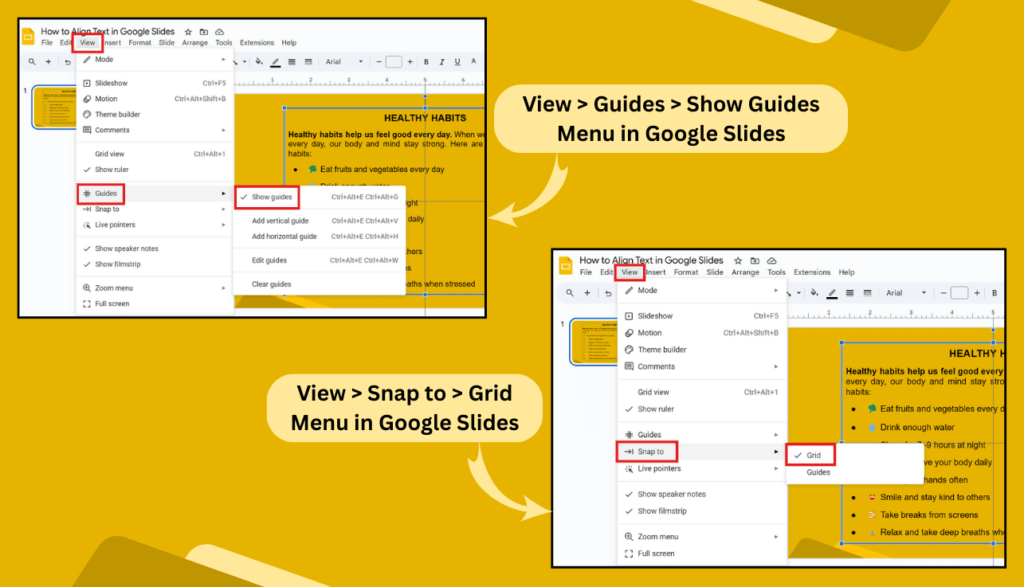
🎯 This is super useful when placing headings and body text on different slides—they’ll stay in the same spot every time.
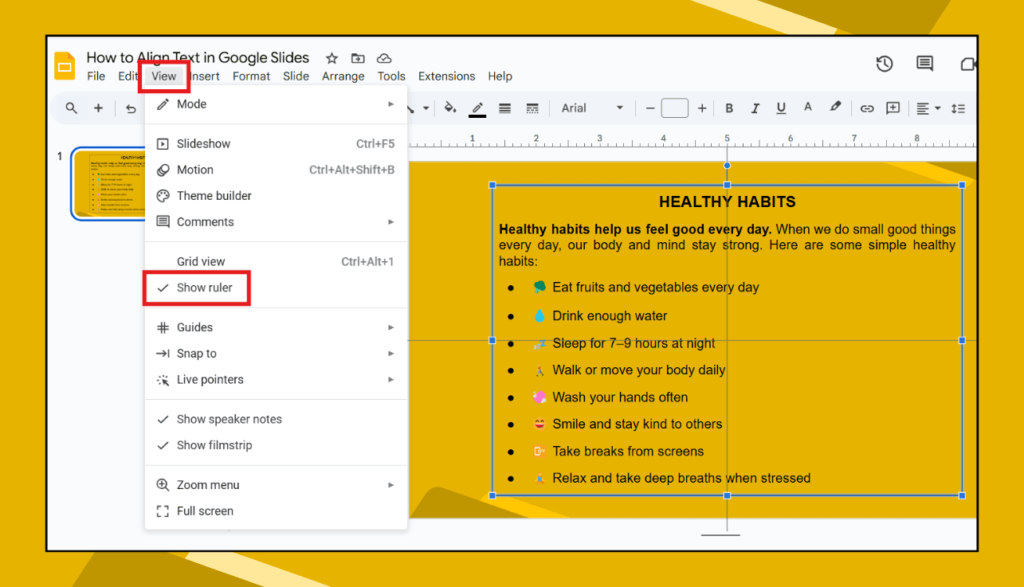
7. Use the Ruler for Precise Positioning
- Go to View > Show ruler.
- You’ll see a ruler at the top and side.
- Drag text boxes and place them exactly where you want using the numbers.
- You can also drag in custom guidelines from the ruler—great for keeping things aligned across slides.
8. Use Keyboard Shortcuts
Here are a few shortcuts that save time:
- Ctrl + Shift + L = Align left
- Ctrl + Shift + E = Center align
- Ctrl + Shift + R = Align right
(Mac: Use Command (⌘) instead of Ctrl)
9. Nudge Your Text for Fine-Tuning
Want to move your text slightly?
- Click the text box and use the arrow keys for tiny adjustments.
- Hold Shift while pressing arrows for faster movement.
Small Design Tips to Keep Your Slides Clean
✔ Use the same font and size for similar text.
✔ Don’t overcrowd your slides with too much text.
✔ Use bullet points instead of long blocks.
✔ Add white space—it makes slides easier to read.
✔ Align every element with purpose.
Note: Consistency is key. If your heading is centered on Slide 1, it should be centered on the rest too.
Frequently Asked Questions (FAQs)
Q1: How can I center both the text and the box itself?
👉 First, center the text inside the box. Then, go to Arrange > Align > Center to center the box on the slide.
Q2: How do I align bullet points with the rest of my content?
👉 Use Format > Align & Indent > Indentation options. Keep margins and indents consistent with other text.
Q3: Why does my text box look uneven even after aligning?
👉 Check if there are extra spaces or line breaks. Also, turn on Snap to guide to align accurately.
Q4: Can I save alignment settings for all slides?
👉 Not directly, but you can create a master layout or duplicate a slide with perfect alignment to keep the same structure.
Q5: What’s the best alignment for titles and headings?
👉 Usually, center alignment works best for titles, while left alignment works great for body text and bullet points.
When everything lines up well—from bullet points to titles—your presentation looks sharp, professional, and super easy to follow. And now that you know how to do it right in Google Slides, every slide can stand out.