| Quick Tips for Creating Grids in Google Slides 🔶 Use the View menu to turn on guides and gridlines. 🔶 Hold Shift while drawing shapes to keep them even. 🔶 Copy and paste shapes to make them the same size. 🔶 Use the Arrange menu to align objects perfectly. 🔶 Group your grid elements to move them together. 🔶 Try different colors to make your grid stand out. 🔶 Save your grid as a template for future use. |
Introduction
Making grids in Google Slides is easier than most people think. About 85% of presenters never use grids, but they miss out on making their slides look clean and organized. A good grid can turn a messy slide into something that looks professional and easy to read.
Grids help you line up text, pictures, and shapes in neat rows and columns. They make your presentation look tidy and help your audience focus on what matters most. The best part? You don’t need any special skills or tools to make them.
What is a Grid in Google Slides?
A grid is like invisible lines that help you place things in the right spots on your slide. Think of it like graph paper – it has rows and columns that make everything look neat and organized.
When you use grids in your slides, everything lines up perfectly. Your text boxes sit in straight lines. Your images don’t look crooked. Your whole presentation looks more professional.
Why Should You Use Grids in Your Presentations?
Grids make your slides look better in many ways:
- Better Organization: Everything has its place. No more random text boxes floating around your slide.
- Faster Work: You can place objects quickly without guessing where they should go.
- Professional Look: Your slides will look like a designer made them.
- Easy Reading: People can follow your content better when it’s organized in a grid.
- Consistent Style: All your slides will have the same neat look.
Step-by-Step Guide: How to Create a Grid in Google Slides
Method 1: Using Built-in Gridlines
This is the easiest way to make a grid. Google Slides has hidden gridlines that you can turn on.
Step 1: Open your Google Slides presentation.
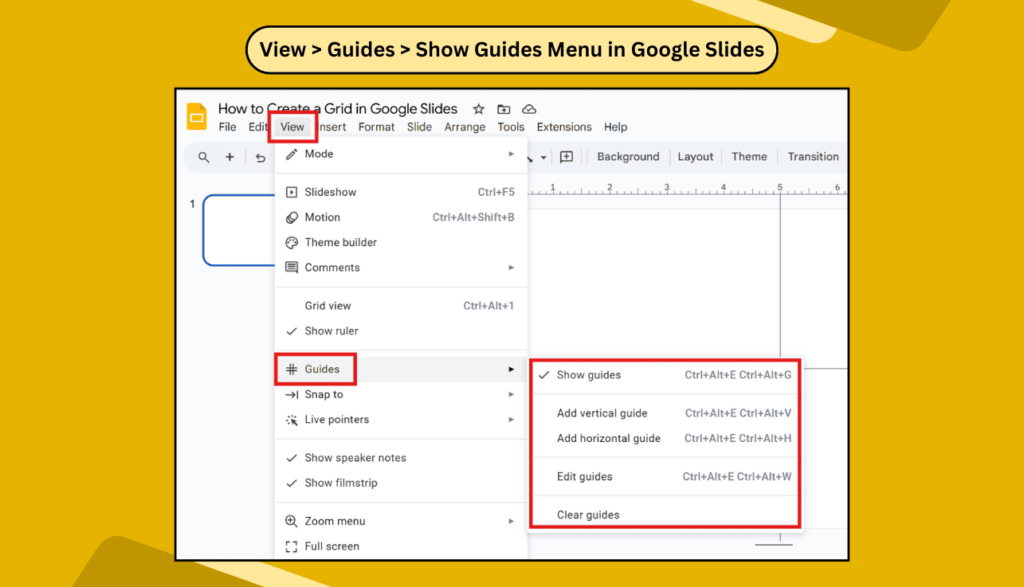
Step 2: Click on “View” in the top menu.
Step 3: Click on Guides > Show guides.
Step 4: You’ll see thin lines in the middle — these help you line things up.
👉 Pro Tip:
Click Add vertical guide or Add horizontal guide to create more lines where you need them.
Method 2: Creating Custom Grids with Shapes
Sometimes you want a grid that shows up in your final presentation. Here’s how to make one with shapes.
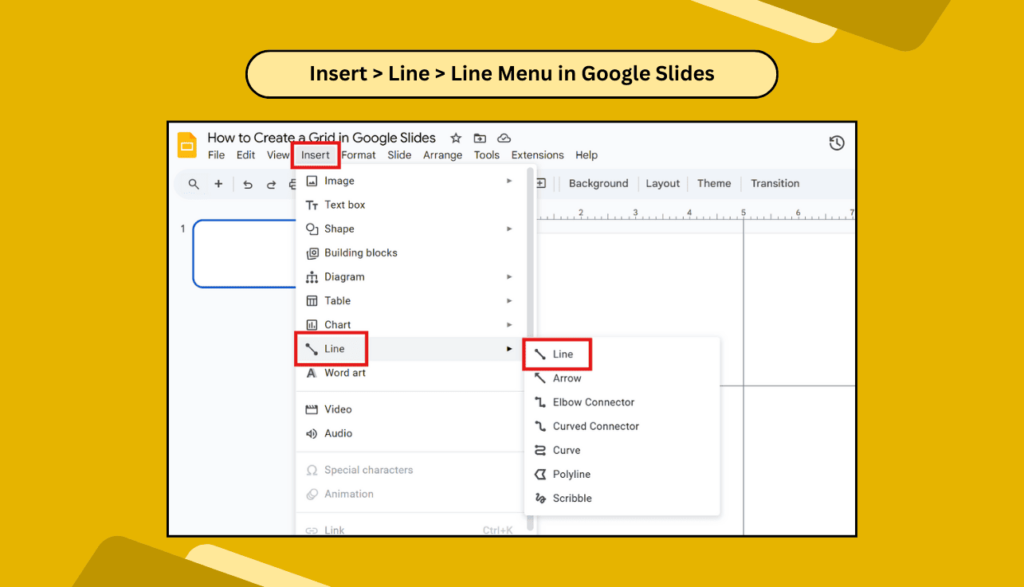
Step 1: Click on “Insert” in the top menu.
Step 2: Choose “Line” > “Line” menu.
Step 3: Draw a straight line across your slide. Hold Shift while drawing to keep it perfectly straight.
Step 4: Copy this line by pressing Ctrl+C (or Cmd+C on Mac).
Step 5: Paste the line several times using Ctrl+V (or Cmd+V on Mac).
Step 6: Move each line to create rows. Space them evenly apart.
Step 7: Repeat this process to create vertical lines for columns.
Method 3: Using Tables as Grids
Tables work great as grids, especially when you want to add text or images to each section.
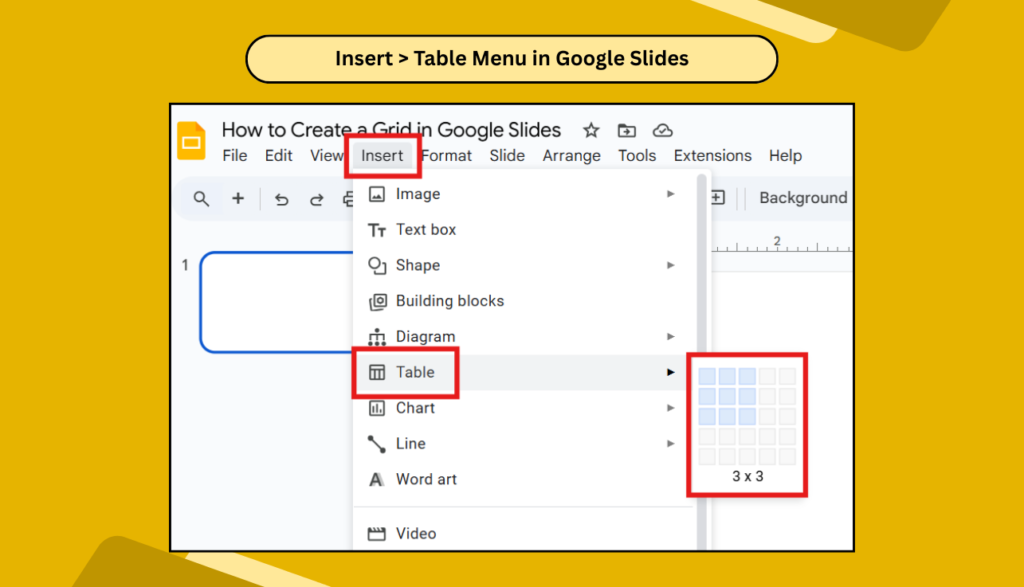
Step 1: Click “Insert” in the menu.
Step 2: Select “Table.”
Step 3: Choose how many rows and columns you want. A 3×3 grid works well for most slides.
Step 4: The table appears on your slide. You can now add content to each cell.
How to Customize Your Grid
🔷Changing Grid Colors
For Shape Grids:
- Click on a grid line.
- Choose the line color from the toolbar.
- Pick colors that match your presentation theme.
For Table Grids:
- Right-click on the table.
- Select “Table properties”.
- Choose your border color.
🔷Adjusting Grid Size
For Built-in Gridlines:
- You can’t change the size of built-in gridlines.
- They’re fixed to help with standard alignment.
For Custom Grids:
- Click and drag the lines to move them.
- Make rows and columns bigger or smaller as needed.
- Keep spacing even for the best look.
🔷Making Grids Transparent
Sometimes you want a grid that’s barely visible:
- Select your grid lines.
- Use the transparency tool in the toolbar.
- Make them about 50% transparent.
- This creates subtle guidelines without being distracting.
Common Mistakes to Avoid
- Making Grids Too Visible: Your grid should help organize content, not compete with it. If your grid lines are too thick or bright, they’ll distract from your main message.
- Ignoring Content Hierarchy: Not all content is equally important. Use your grid to highlight key information by giving it more space or a central position.
- Overcrowding Sections: Don’t try to fit too much content in each grid section. Leave some white space to make your slide easy to read.
- Inconsistent Alignment: When using grids, make sure everything aligns properly. Crooked text boxes or images will make your grid look sloppy.
Advanced Grid Techniques
🔷Creating Diagonal Grids
For a more creative look, try diagonal grids:
- Draw diagonal lines instead of straight ones.
- This works great for creative presentations.
- Use sparingly – it can be hard to read if overused.
🔷Combining Different Grid Types
You can mix different grid styles on one slide:
- Use a table grid for the main content.
- Add shape grids for decorative elements.
- Keep the overall design balanced.
🔷Using Grids for Image Layouts
Grids work perfectly for photo layouts:
- Create a grid with equal sections.
- Place one image in each section.
- This creates a clean, organized photo gallery.
Troubleshooting Common Grid Problems
🔷Grids Not Showing Up
If your gridlines don’t appear:
- Check the View menu again.
- Make sure “Show gridlines” is selected.
- Try zooming in – sometimes gridlines are hard to see at small sizes.
🔷Objects Not Snapping to Grid
To make objects snap to your grid:
- Go to the View menu.
- Select “Snap to” then choose “Grid”.
- Now objects will automatically align to grid lines.
🔷Grid Lines Too Light or Dark
For built-in gridlines, you can’t change the color. If they’re hard to see:
- Adjust your screen brightness.
- Use custom shape grids instead.
- Choose colors that work better for your setup.
FAQs
1. Can I save my grid as a template in Google Slides?
Yes, you can save slides with grids as templates. Create your perfect grid layout, then go to “File” and select “Make a copy.” Use this copy as your starting point for future presentations.
2. Do grids show up when I present my slides?
Built-in gridlines from the View menu don’t show up during presentations – they’re just for editing. Shape grids and table borders will show up unless you make them transparent or remove the borders.
3. Can I use grids on mobile devices?
Google Slides mobile apps have limited grid features. You can see existing grids but creating new ones works better on desktop computers.
4. How do I delete a grid I created?
For shape grids, select all the lines and press Delete. For table grids, right-click on the table and choose “Delete table.” Built-in gridlines can be turned off in the View menu.
5. What’s the best grid size for presentations?
A 3×3 grid works well for most presentations. It gives you 9 sections to work with, which is enough for most content without being too complex.
6. Can I make curved grids in Google Slides?
Google Slides doesn’t have built-in curved grid tools, but you can create curved grids using the curve tool under shapes. This takes more time but can create unique layouts.
7. How do I make my grid look professional?
Keep grid lines thin and subtle, use consistent spacing, align all content properly, and don’t overcrowd your sections. Less is often more when it comes to professional-looking grids.
Making grids in Google Slides is a simple way to create better-looking presentations. Whether you use built-in gridlines, custom shapes, or tables, grids help you organize content and make your slides look more professional. Start with simple grids and experiment with different styles as you get more comfortable with the tools.