| Beginner Tips for Creating Gradients in Google Slides: 🔷Open your Google Slides presentation first. 🔷Click on the shape or text box you want to change. 🔷Go to the fill color option in the toolbar. 🔷Pick “Gradient” from the color menu. 🔷Choose your favorite colors. 🔷Adjust the gradient direction if needed. 🔷Save your work when done. |
Introduction
Colors speak louder than words. When you see a beautiful sunset with its soft color blend, it makes you stop and look. That same magic can happen in your Google Slides presentations when you use gradients.
A gradient is simply colors that blend smoothly into each other. Think of how the blue sky slowly turns white near the horizon. That smooth color change is what makes presentations look professional and eye-catching.
Many people think making gradients in Google Slides is hard work. But it’s actually very easy once you know the right steps. You can create amazing gradient backgrounds, colorful text effects, and stunning shapes in just a few clicks.
What is a Gradient and Why Use It?
A gradient is when two or more colors mix together smoothly. Instead of having a solid red box, you can have a box that starts red and slowly becomes yellow. This creates depth and makes your slides more interesting to look at.
Gradients make your presentations stand out because:
- They add visual interest to plain backgrounds.
- They make the text easier to read when done right.
- They give your slides a modern, professional look.
- They help guide the viewer’s eye to important parts.
- They work well for both business and creative presentations.
How to Add Gradient to Shapes in Google Slides
Making gradient shapes is the most common way to use this feature. Here’s how to do it step by step:
Step 1: Insert Your Shape
First, you need to add a shape to your slide. Click on the “Insert” menu at the top of your screen. Then click “Shape” and pick any shape you like. Draw it on your slide by clicking and dragging.

Step 2: Select the Shape
Click on your shape to select it. You’ll see small squares around the edges when it’s selected.

Step 3: Open Fill Color Options
Look for the paint bucket icon in your toolbar. Click on it to open the fill color menu.
Step 4: Choose Gradient
In the color menu, you’ll see different options. Click on “Gradient” to see all the gradient choices.

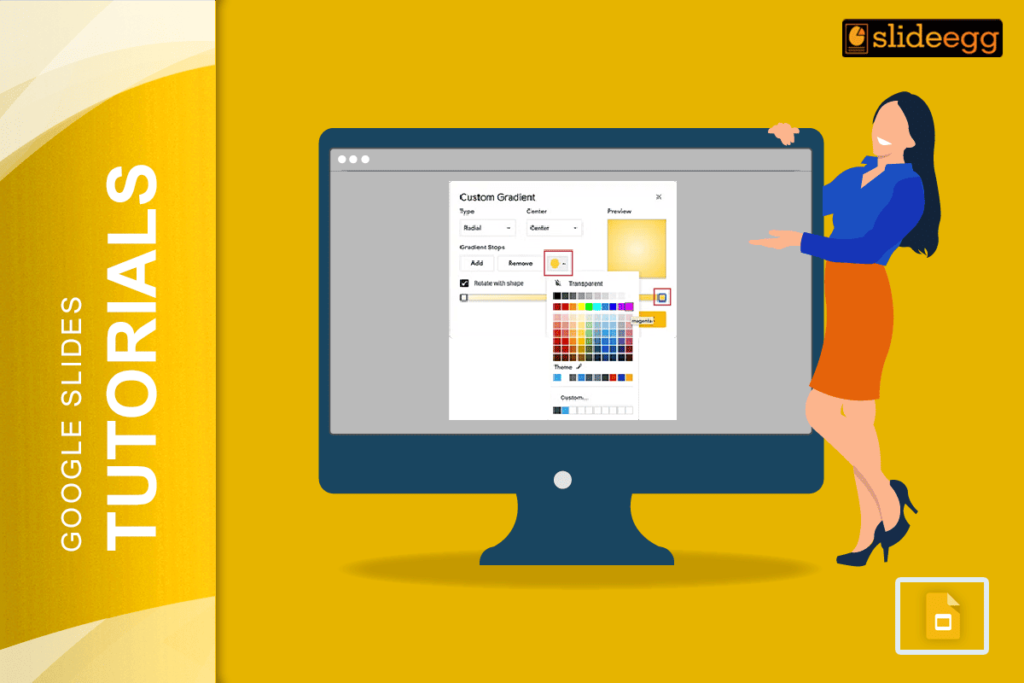
Step 5: Pick Your Colors
Google Slides gives you many ready-made gradients. Click on anyone you like. If you want custom colors, click “Custom” at the bottom.

Step 6: Adjust if Needed
You can change how the gradient looks by picking different directions. Try “Linear” for straight blends or “Radial” for circular effects.

Creating Gradient Backgrounds in Google Slides
Making your whole slide have a gradient background is simple and looks amazing:
Step 1: Right-click on Slide
Click on the Background option from the toolbar or right-click anywhere on your slide where there’s no text or shapes.
Step 2: Choose Change Background
Click “Change background” from the menu that appears.
Step 3: Select the Color Option
Click on the color box in the background settings.
Step 4: Apply Gradient
Just like with shapes, click “Gradient” and choose your colors. Your whole slide will now have a beautiful gradient background.

Making Gradient Text in Google Slides
While Google Slides doesn’t have direct gradient text options, you can create cool text effects:
Method 1: Use WordArt
Go to “Insert” then “WordArt”. Type your text and press Enter. You can then apply gradients to this text object just like shapes.

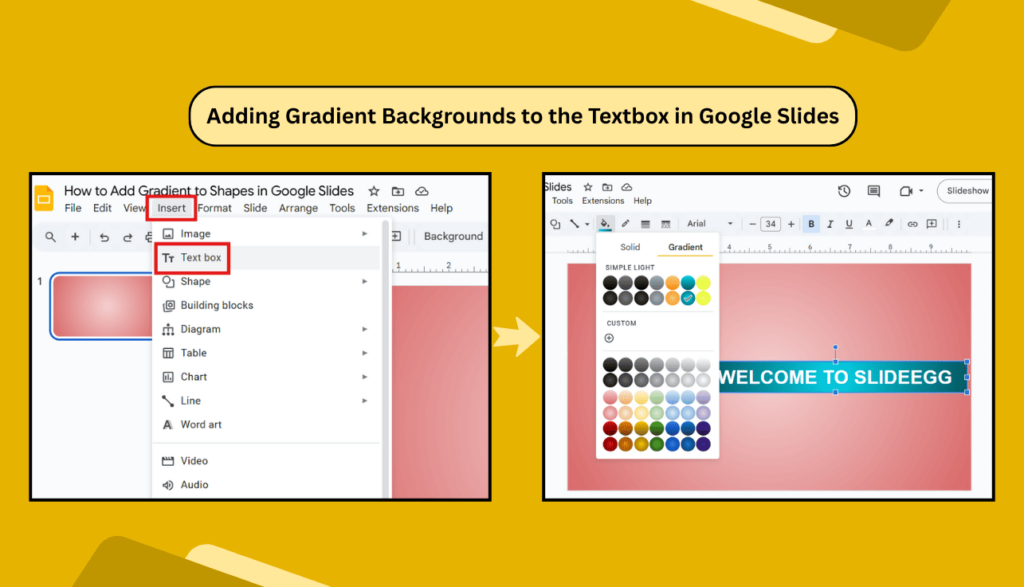
Method 2: Text Box with Gradient Background
Create a text box, add your text, and then add a gradient background to the text box. Make sure your text color contrasts well with the gradient.
Best Color Combinations for Gradients
Picking the right colors makes all the difference. Here are some combinations that always look good:
For Business Presentations:
- Blue to light blue (professional and calm)
- Gray to white (clean and modern)
- Dark blue to light gray (trustworthy feel)
For Creative Projects:
- Pink to orange (warm and friendly)
- Purple to blue (creative and cool)
- Green to yellow (fresh and natural)
For Backgrounds:
- Light colors work best for text readability.
- Dark gradients look good for title slides.
- Subtle gradients don’t distract from content.
Common Mistakes to Avoid
- Using Too Many Colors: Stick to two or three colors maximum. Too many colors make gradients look messy and unprofessional.
- Picking Colors That Don’t Match: Make sure your gradient colors work well together. Red and green might clash, but red and orange blend nicely.
- Making Gradients Too Bright: Very bright gradients can make text hard to read. Use softer, lighter versions for backgrounds.
- Overusing Gradients: Don’t put gradients on everything. Use them as accents to highlight important parts of your presentation.
Advanced Gradient Tips and Tricks
- Adjust Gradient Direction: You can change which way your gradient flows. Try different angles to see what looks best with your content.
- Use Transparency: Combine gradients with transparency to create subtle effects that don’t overpower your text.
- Match Your Brand Colors: If you have company colors, create custom gradients using those colors to keep your brand consistent.
- Test on Different Devices: Gradients might look different on phones and tablets. Check how they appear on various screen sizes.
Troubleshooting Gradient Problems
- Gradient Option Missing: If you can’t find the gradient option, make sure you’ve selected a shape or background first. The gradient option only appears when you have something selected.
- Colors Look Different: Sometimes gradients appear differently when you present them compared to edit mode. Always preview your presentation before showing it to others.
- Gradient Looks Choppy: If your gradient has visible bands instead of smooth color changes, try using colors that are closer together on the color wheel.
Making Your Gradients Look Professional
- Keep It Simple: The best gradients are often the simplest ones. Two colors that blend well together usually look better than complex multi-color gradients.
- Consider Your Content: Make sure your gradient doesn’t compete with your text and images. It should support your content, not distract from it.
- Stay Consistent: Use similar gradient styles throughout your presentation. This creates a cohesive, professional look.
- Think About Your Audience: Business presentations might need subtle, professional gradients while creative projects can use bolder, more colorful options.
Frequently Asked Questions
1. Can I create custom gradients in Google Slides?
Yes, you can create custom gradients by selecting “Custom” in the gradient menu. This lets you pick your own colors and adjust how they blend together.
2. How do I make a gradient background for my entire presentation?
You can apply a gradient to individual slides through the background settings, but you’ll need to apply it to each slide separately. There’s no option to apply one gradient to all slides at once.
3. Why can’t I add gradients to the text directly?
Google Slides doesn’t support direct gradient text formatting. You need to use WordArt or create text boxes with gradient backgrounds as workarounds.
4. Do gradients work well for printed presentations?
Gradients can look different when printed compared to on-screen. If you plan to print your presentation, test print a slide first to see how the gradients appear.
5. Can I copy gradients between shapes?
Yes, you can copy formatting between shapes. Select a shape with the gradient you like, copy it, then select another shape and paste the formatting.
6. What’s the difference between linear and radial gradients?
Linear gradients blend colors in straight lines (like left to right), while radial gradients blend colors in circular patterns from the center outward.
7. How many colors can I use in one gradient?
While Google Slides allows multiple colors, it’s best to stick to 2-3 colors for the cleanest, most professional look.
8. Can I animate gradients in Google Slides?
You can’t animate the gradient itself, but you can animate shapes that have gradients applied to them using the normal animation tools.
Let’s Wind Up
Creating beautiful gradients in Google Slides is easier than most people think. With these simple steps and tips, you can make presentations that look professional and capture your audience’s attention. Remember to keep your gradients simple, choose colors that work well together, and always think about how they support your content. Start with basic gradients and experiment as you get more comfortable with the feature.