If Google Slides doesn’t allow you to include PDFs directly in your presentations, don’t worry; there are a couple of solutions you can use to show your PDF content.
You can take screenshots of the important pages and use them as photos in your slides. Alternatively, upload the PDF to an online platform and then create links to it from your presentation.
This way, your audience can still access the PDF information seamlessly. There are two ways to insert a PDF in Google Slides.
Convert the PDF pages to images and insert them as images:
This is the most common way to insert PDFs in Google Slides. To do this, you will need to use a PDF-to-image converter to convert your PDF pages to images. Once you have the images, you can insert them into your Google Slides as images.
Upload your PDF to a cloud drive and insert a link to it:
This method allows you to view the PDF file in its entirety without having to convert it to images. To do this, you will need to upload your PDF to a cloud drive like Google Drive or Dropbox. Once you have uploaded your PDF, you can insert a link to it in your Google Slides Templates.
Method 1: Convert The PDF Pages To Images And Insert Them As Images.
- Open your Google Slides presentation.
- Go to the slide where you want to insert the PDF.
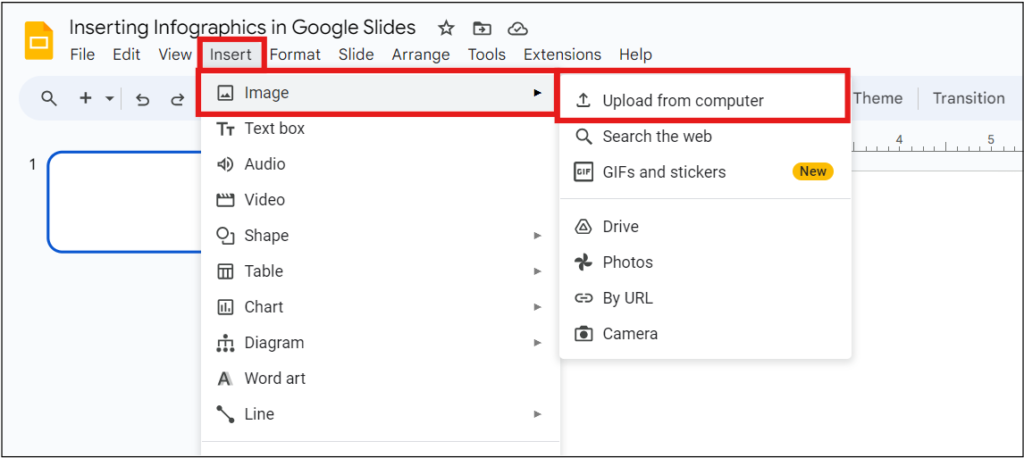
- Click on the Insert menu.
- Click on Image.
- Click on Upload from the computer.

- Browse to the folder where you saved the images of your PDF pages.
- Select the images that you want to insert.
- Click on Open.
The images will be inserted into your Google Slides.
Method 2: Upload Your PDF To A Cloud Drive And Insert A Link To It.
- Open your Google Slides presentation.
- Go to the slide where you want to insert the PDF.
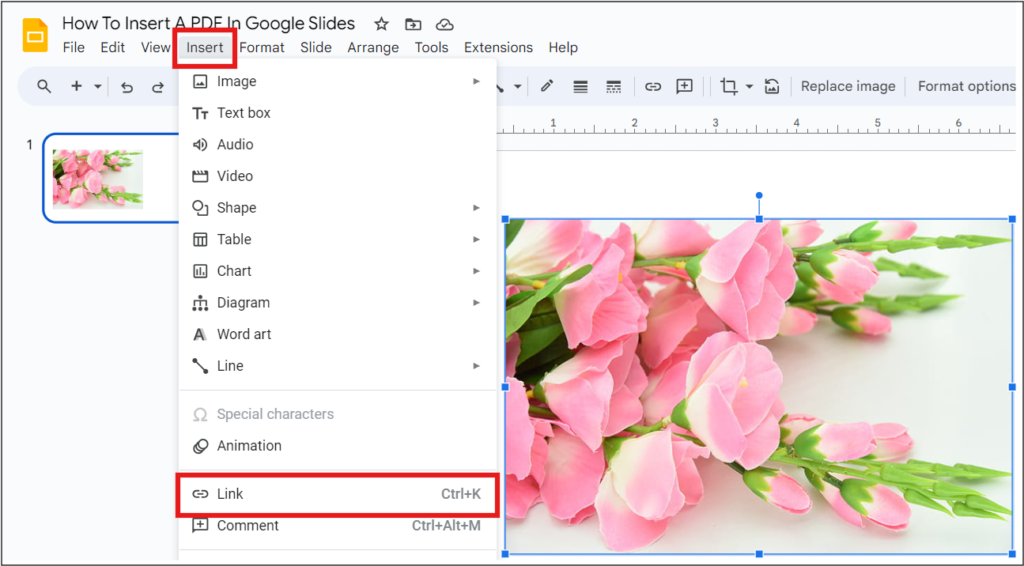
- Click on the Insert menu.
- Click on the Link.
- In the Link to the field, enter the URL of your PDF file.

When you click on the link, the PDF file will open in a new window.
Conclusion
We hope, our guidelines help you to insert PDFs into Google Slides. Practice it regularly. Be a pro!


