
| ✅ Quick Tips: How to Delete Multiple Presentations in Google Slides 🚮 Google Slides doesn’t let you delete files from the app itself. 🚮 You need to open Google Drive to manage and delete your slides. 🚮 Use Ctrl (Windows) or Cmd (Mac) to select multiple files. 🚮 Hit the trash bin icon or right-click and choose “Remove.” 🚮 Files go to Trash – delete them permanently from there if needed. |
Got a bunch of old Google Slides cluttering up your Drive? Instead of deleting them one by one, there’s a much quicker way to tidy things up. This guide will show you the simple steps to select and remove multiple presentations at once, so you can get your Google Drive feeling nice and organized without the hassle. Let’s get started!
📂 Where Are My Google Slides Stored?
This is important: Google Slides presentations are stored in Google Drive, not inside the Slides app. That means, if you want to delete them, you have to go to Google Drive.
🧹 How to Delete Multiple Google Slides from Google Drive
Here’s a simple way to delete a bunch of slides at once:
👉 Step-by-step guide:
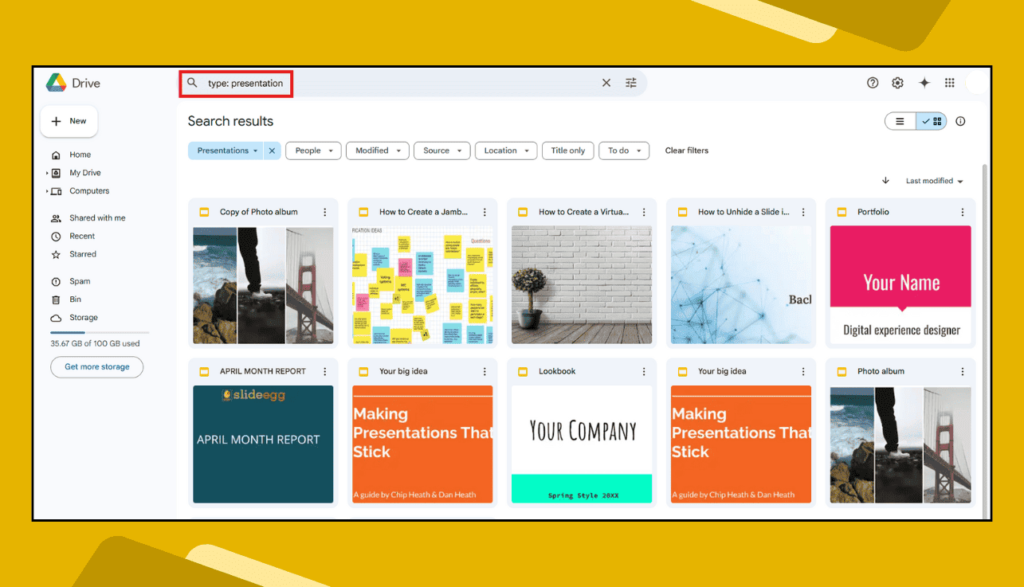
- Open Google Drive.
- Log in to your Google account (the same one you used for Slides).
- In the search bar, type “type: presentation”.
- This shows only Google Slides files.
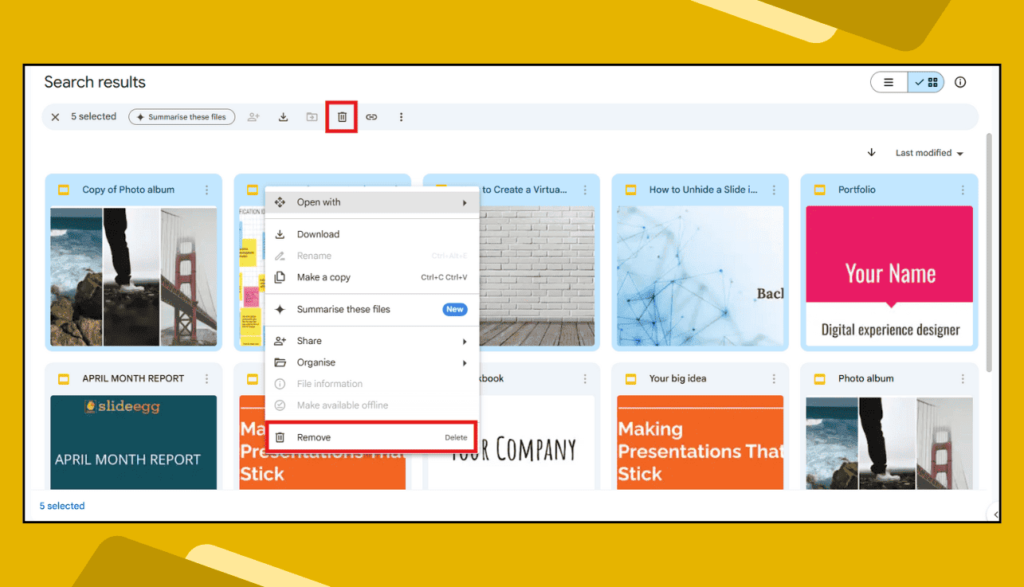
- Hold down the Ctrl key (Windows) or Cmd key (Mac).
- Click on each slide file you want to delete.
- Once selected, right-click on any one of them.
- Choose “Remove” from the menu.
- Or click the “Remove” icon.
- Done! The files are moved to the Trash.
🗑️ Want to Delete Slides Permanently?
After you remove files, they go to your Trash. To free up space completely:
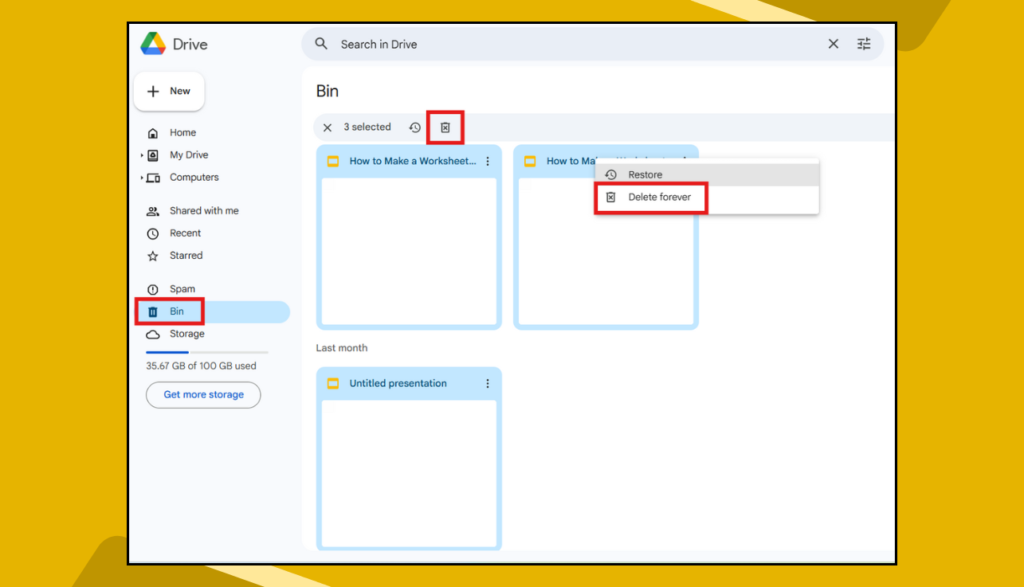
- Go to the Bin section in Google Drive (left sidebar).
- Select the files again using Ctrl or Cmd.
- Right-click and select “Delete forever.”
- Or click the “Delete forever” icon (Trash icon with X inside).
⚠️ Be careful! Once deleted forever, you can’t get them back.
🙋♀️ What If You Delete the Wrong File?
Don’t panic! You can still get it back if it’s not deleted forever:
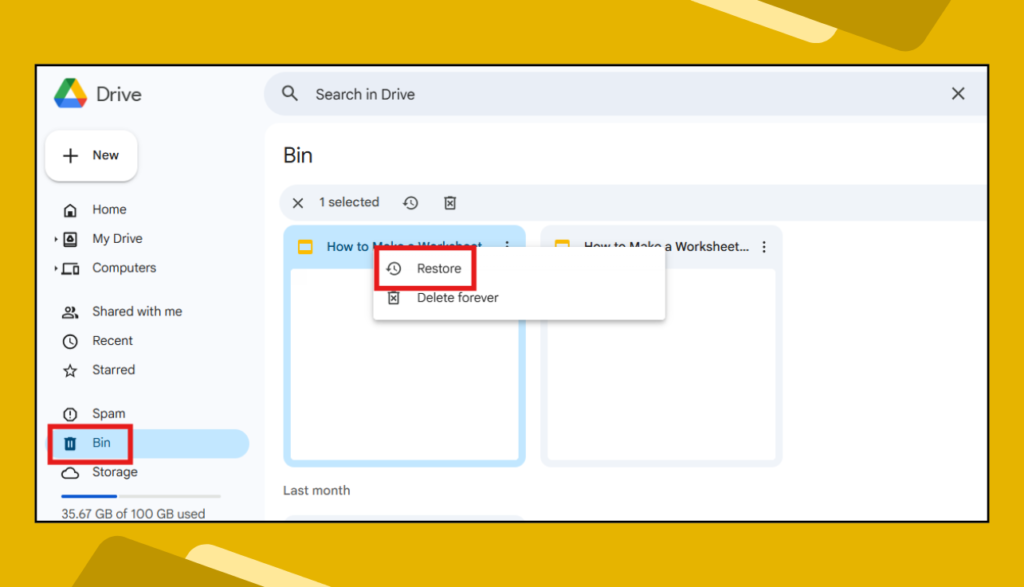
- Go to the Trash section in Google Drive (left menu).
- Find the file you deleted.
- Right-click on it.
- Choose “Restore” to bring it back to its original location.
📅 You have 30 days to restore it before Google deletes it permanently.
🙋♀️ Why Should I Clean Up My Google Slides?
- 💾 Save Storage Space: Google gives 15GB of free storage. Unused files take up space.
- 🧠 Reduce Confusion: Easier to find what you actually need.
- ⏱️ Work Faster: A neat Drive means faster searching.
- ✅ Stay Organized: Especially helpful for students and teachers with many files.
🔍 Extra Tips to Stay Organized
- Use folders to sort slides by subject or project.
- Add clear names to your files, like “Math_Quiz_March” or “Client_Pitch_April.”
- Regularly check your Trash and clean it.
🧠 FAQs: Deleting Multiple Google Slides
Q1. Can I delete Google Slides from my phone?
Yes, but it’s easier on a computer. On mobile, long-press files in Google Drive and tap the trash icon.
Q2. What happens if I accidentally delete the wrong file?
Go to Trash and click “Restore” before it’s permanently deleted (you have 30 days).
Q3. Can I recover deleted slides after 30 days?
No. After 30 days in the Trash, Google deletes them forever.
Q4. Can I delete slides inside a presentation instead of the whole file?
Yes! Open the file, right-click on the slide (in the left bar), and choose “Delete” to remove only that slide.
✨ Final Words
Keeping your Google Slides neat and tidy makes your digital life so much easier. With just a few clicks, you can get rid of old or unused presentations and keep everything in order.
It’s like cleaning your room—your brain feels better when things aren’t all over the place.