
Creating a professional and engaging presentation is crucial for effectively communicating your ideas. One way to enhance the readability and professionalism of your slides is by using superscript and subscript text. Whether you are preparing a scientific presentation, a mathematical equation, or simply need to adjust the appearance of your text, knowing how to add superscripts and subscripts in Google Slides can be incredibly useful. In this guide, we’ll walk you through the detailed steps to do this and suggest some additional tips to make your presentations stand out.
Understanding Superscript and Subscript
Before diving into the instructions, let’s briefly explain what superscripts and subscripts are:
- Superscript: Text that appears slightly above the regular line of text (e.g., x², where ² is the superscript).
- Subscript: Text that appears slightly below the regular line of text (e.g., H₂O, where ₂ is the subscript).
Why Use Superscript and Subscript?
Using superscripts and subscripts can enhance the clarity and visual appeal of your slides. These features are often used in:
- Scientific Formulas: Representing chemical compounds and mathematical equations.
- Footnotes and Citations: Adding references and detailed notes.
- Ordinal Numbers: Displaying dates and rankings (e.g., 1st, 2nd, 3rd).
Step-by-Step Guide to Add Superscript in Google Slides
Using the Format Menu

- Open Your Presentation: Start by opening your Google Slides presentation.
- Select Text: Highlight the text you want to format as superscript.
- Format Menu: Go to the top menu and click on “Format.”
- Text: In the dropdown menu, select “Text.”
- Superscript: Click on “Superscript.” Your selected text will now appear as superscript.
Using Keyboard Shortcuts
- Windows: Press ‘Ctrl’ + ‘.’ (Control and the period key).
- Mac: Press ‘Cmd’ + ‘.’ (Command and the period key).
Step-by-Step Guide to Add Subscript in Google Slides
Using the Format Menu
- Open Your Presentation: Start by opening your Google Slides presentation.
- Select Text: Highlight the text you want to format as subscript.
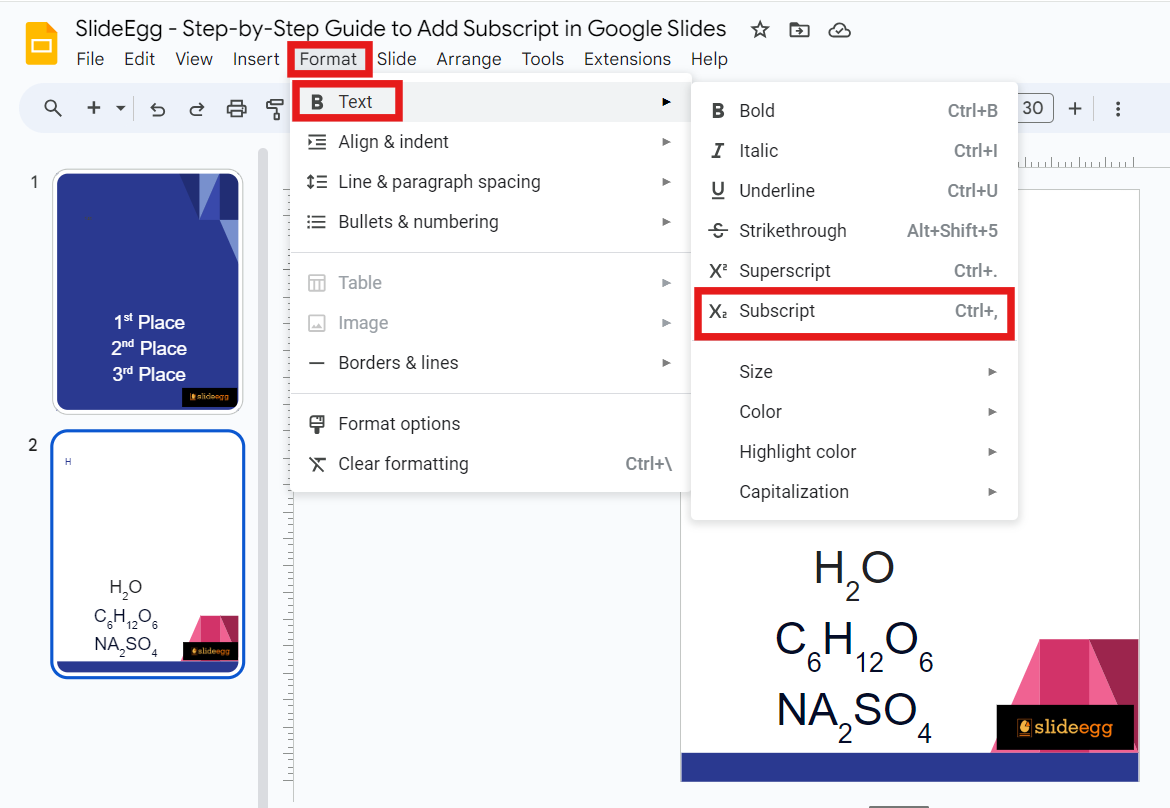
- Format Menu: Go to the top menu and click on “Format.”
- Text: In the dropdown menu, select “Text.”
- Subscript: Click on “Subscript.” Your selected text will now appear as a subscript.
Using Keyboard Shortcuts
- Windows: Press ‘Ctrl’ + ‘,’ (Control and the comma key).
- Mac: Press ‘Cmd’ + ‘,’ (Command and the comma key).
Tips for Using Superscript and Subscript in Google Slides
- Consistency is Key: Ensure that your use of superscripts and subscripts is consistent throughout your presentation.
- Readability: Avoid overusing these features as they can make your slides harder to read.
- Test Your Presentation: Always preview your slides to ensure that the text is displayed correctly on different devices.
Learn More Presentation Hacks to Enhance Your Presentations
Using attractive themes can significantly improve the visual appeal of your presentation. There are many free Google Slides themes available online that you can easily download and use. These themes come with pre-designed slides that you can customize to fit your content, saving you time and effort.
For more tips and tricks on creating stunning presentations, check out our tips & tricks section. This section is packed with valuable insights to help you become a Google Slides pro.
Conclusion
Adding superscripts and subscripts in Google Slides is a simple yet powerful way to enhance your presentations. By following the steps outlined in this guide, you can easily format your text to improve readability and professionalism. Don’t forget to explore the vast collection of free Google Slides themes available online to make your presentations even more engaging. Happy presenting!